What to know how you can easily schedule YouTube Shorts?
And save TIME?
This guide will show you 2 different ways you can save time by scheduling your YouTube Shorts ahead of time.
With the extra time you save, you’ll be able to improve your content, find more followers, and grow your business.
Feel free to skip to the section you're most interested in:
- Should you schedule YouTube Shorts?
- How to schedule YouTube Shorts with YouTube Studi (best for beginners)
- How to schedule YouTube Shorts with Post Planne (best for serious YouTubers)
- How to make a great YouTube Short
- Frequently asked questions
Should you schedule YouTube Shorts?
Do you need to schedule your YouTube Shorts, or is it better to just create content and post it as you go?
You should 100% be scheduling your YouTube Shorts!
Why?
Scheduling your YouTube Shorts offers several advantages for content creators:
- It allows for strategic planning, enabling creators to align their content with specific events, trends, or peak viewership times. This ensures maximum visibility and engagement for your Shorts.
- Scheduling provides creators with the flexibility to maintain a consistent posting schedule without the need for day-to-day effort. In other words, scheduling allows you to set it and forget it.
- It gives you time to thoroughly optimize your video details, including titles, descriptions, captions, etc., enhancing searchability, discoverability, and overall quality.
Ultimately, being proactive and scheduling your Shorts streamlines the process of getting your content out there and saves you tons of time.
How to schedule YouTube Shorts with YouTube Studio (best for beginners)
The first tool that anyone can use to schedule their YouTube Shorts is YouTube Studio. Like any tool, this tool has its pros and cons.
Pros:
- FREE to anyone with a YouTube account
- Easy to use
Cons:
- Only able to schedule 1 post at a time
- You can't easily recycle your top-performing Shorts
- You can’t view all your scheduled videos in a calendar view, making it more difficult to strategize.
(If you're looking for a more advanced scheduling tool that works for all of your social media accounts, skip to the Post Planner section.)
Follow these steps to schedule a YouTube Short with YouTube Studio:
1) Access your YouTube Studio by logging into the YouTube account that you want to post from.
2) Click “Create” in the top right-hand corner.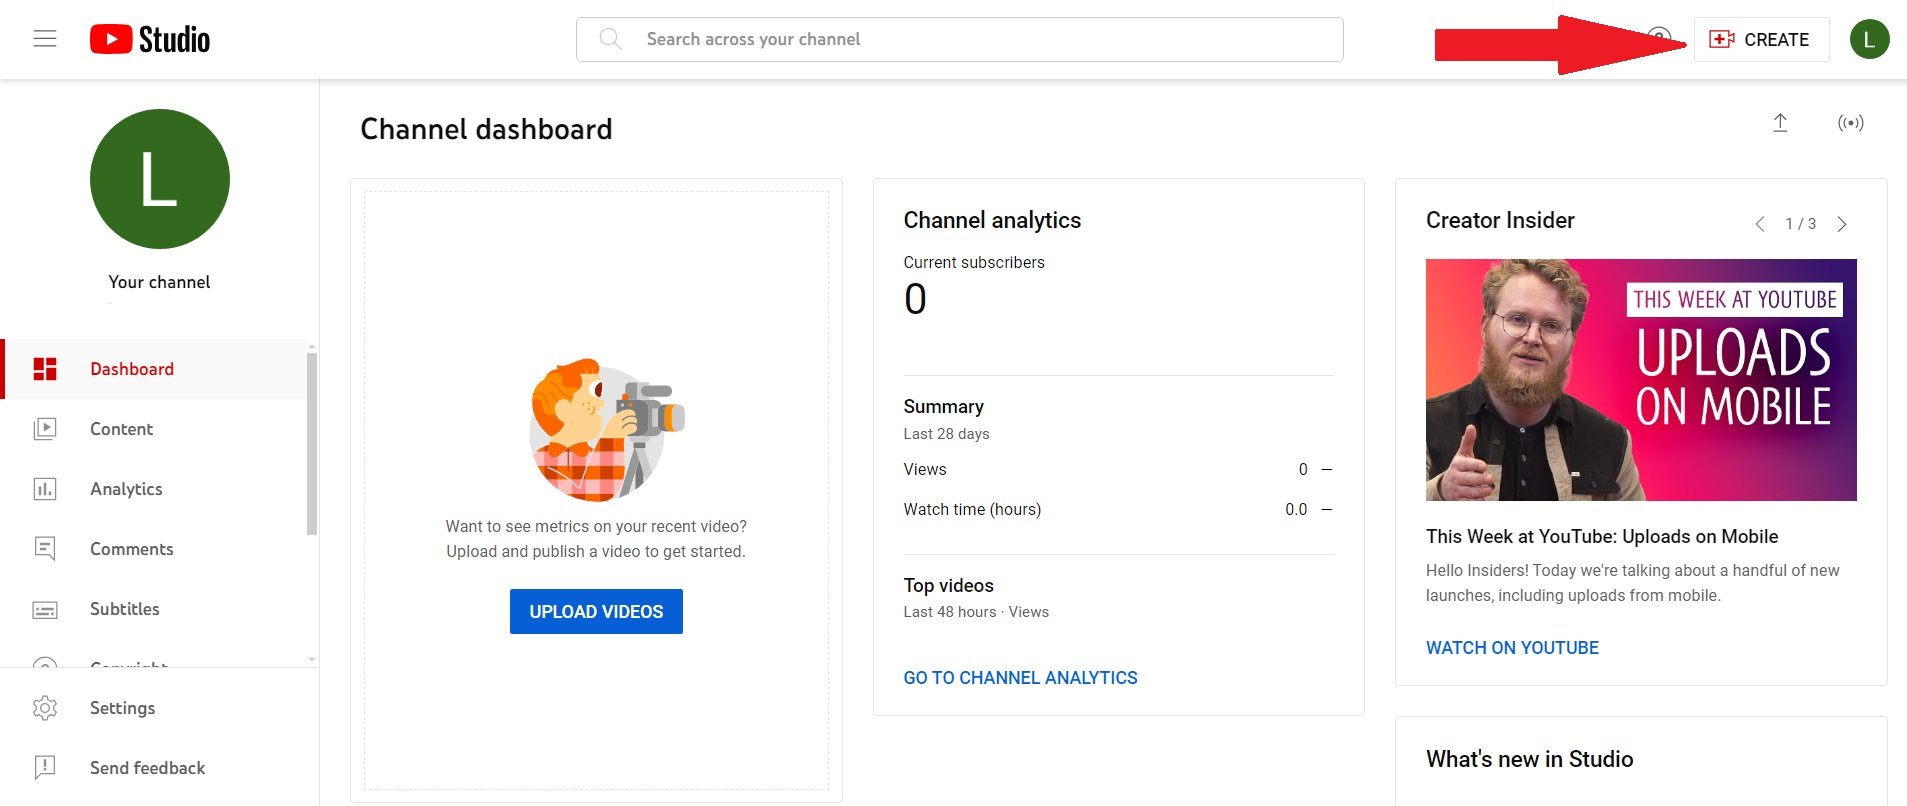
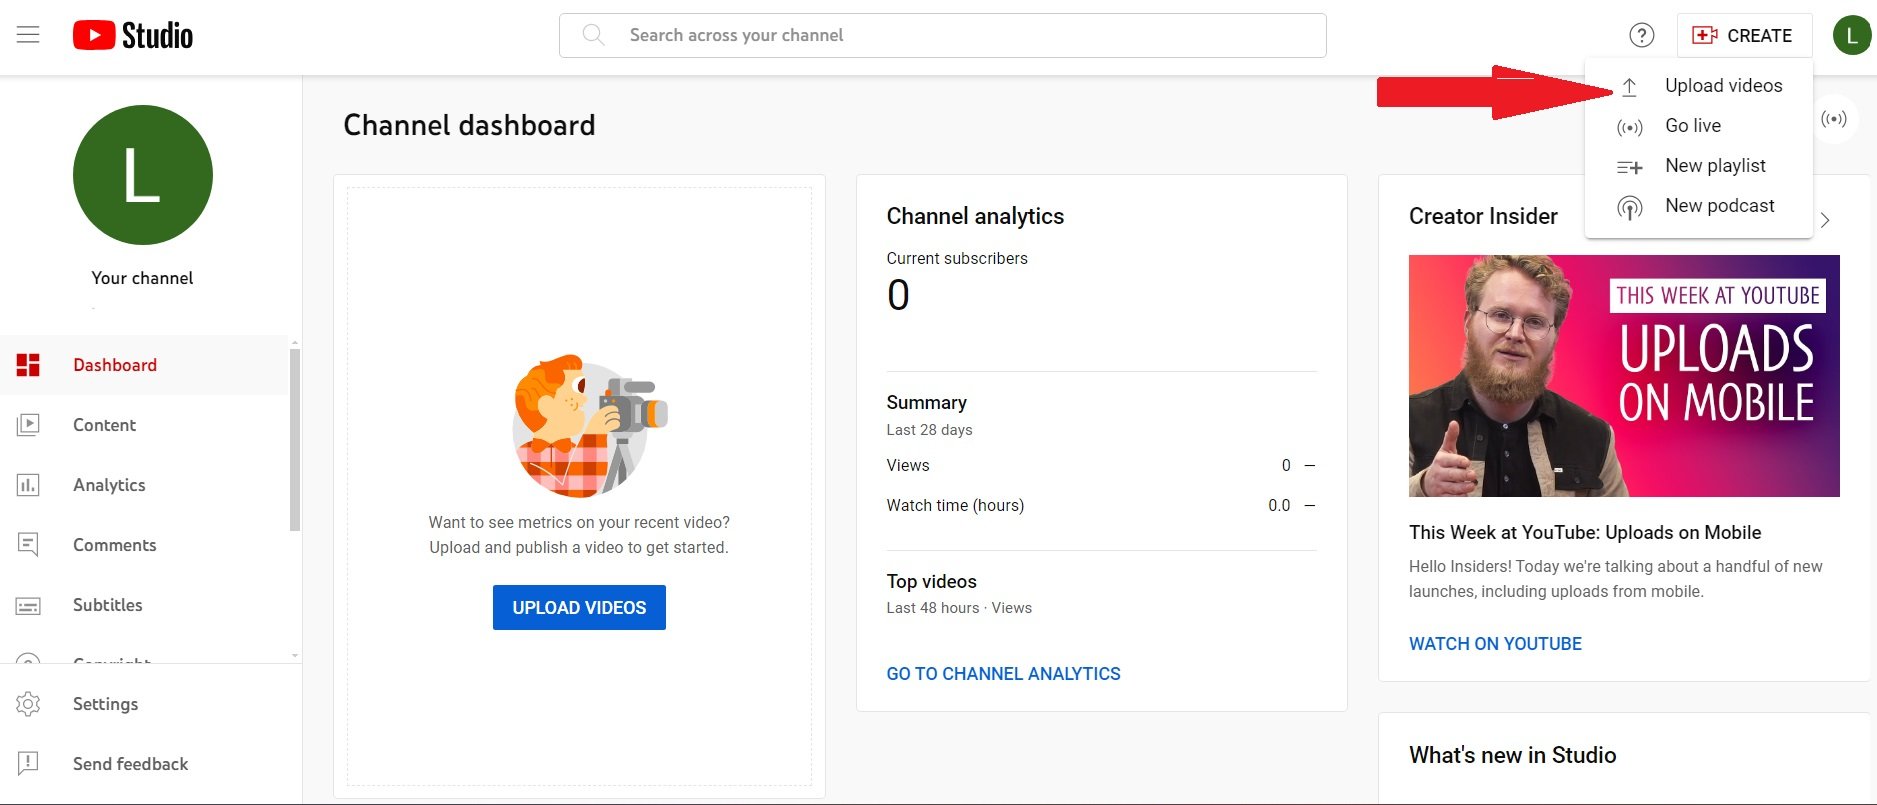
3) Click “Upload videos” in the dropdown menu.
4) Click “Select Files.”
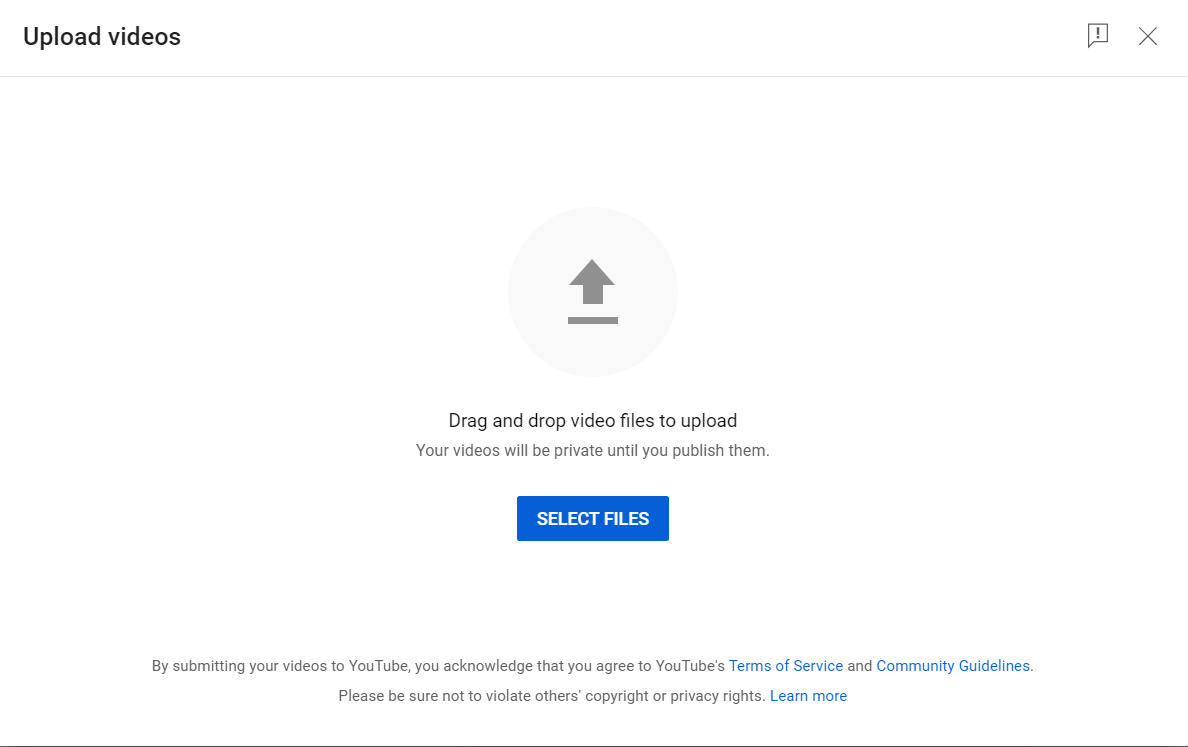
5) Select the video you want to schedule from your computer files.
6) Fill in the details (Title, description, thumbnail, etc.)
7) Click the “Visibility” tab.
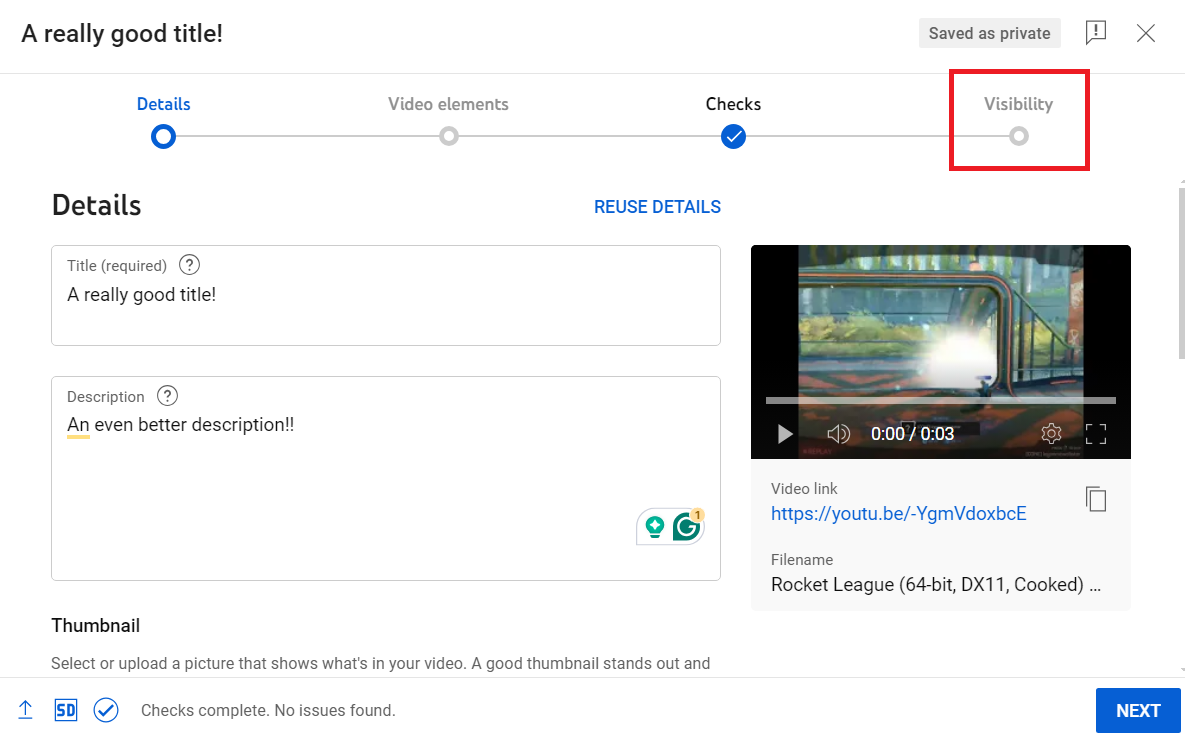
8) Select the date and time you want your Short to go public.
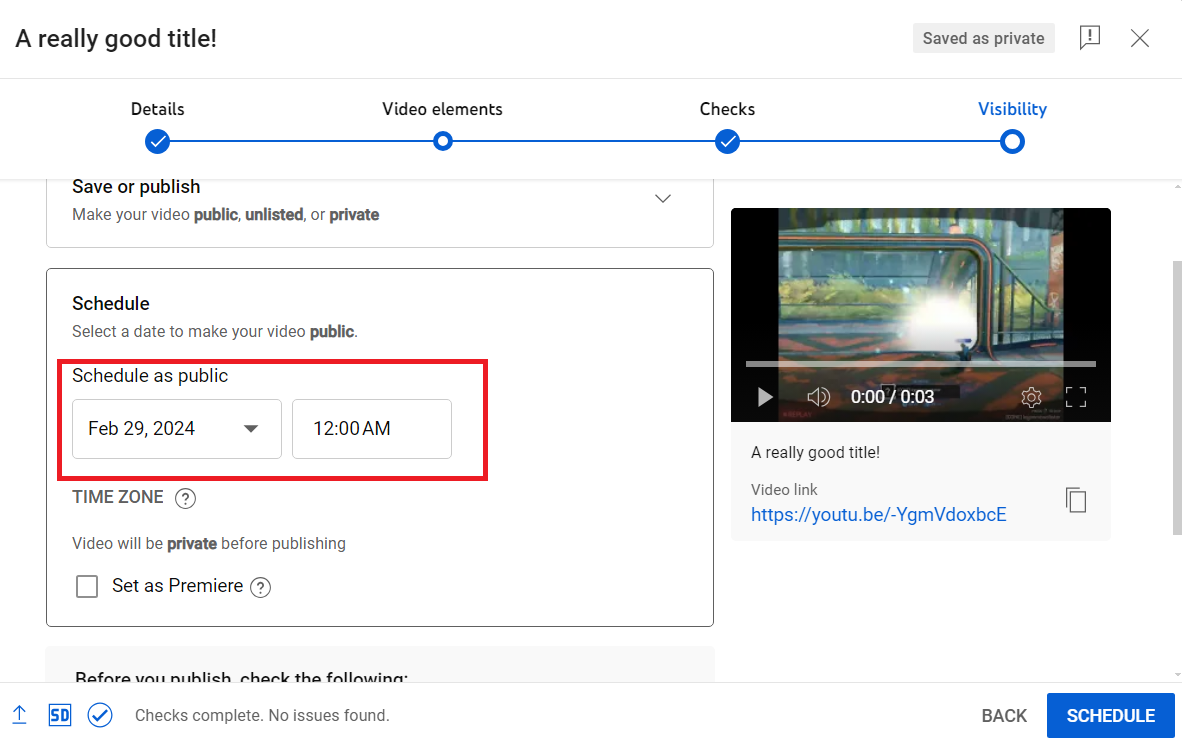
9) Click “Schedule.”
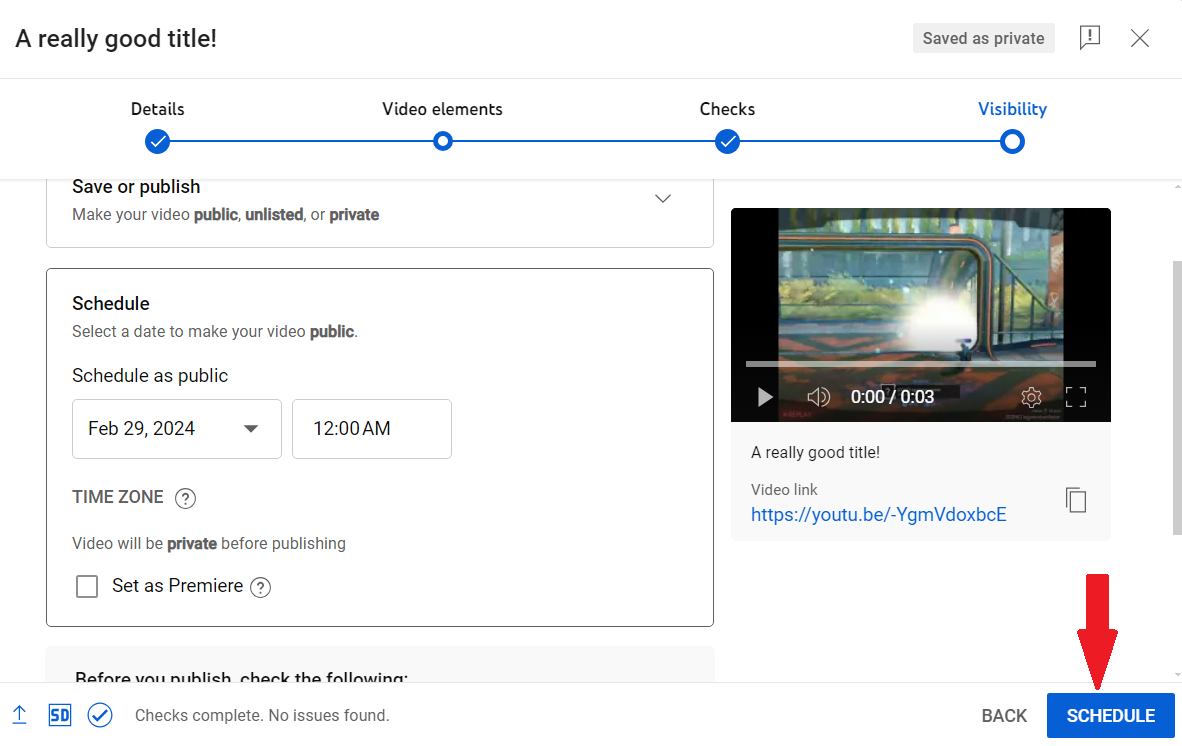
That’s all there is to it!
Just repeat this process to schedule multiple videos and fill your YouTube channel with content!
How to schedule YouTube Shorts with Post Planner (best for serious YouTubers)
If you start to schedule YouTube Shorts regularly, you'll outgrow YouTube Studio's capabilities.
In that case, it may be time to give Post Planner a try.
Post Planner is a social media scheduling tool that helps you schedule your YouTube Shorts, AND helps you find and post content to ANY of your social media channels.
Pros of Post Planner:
- Save time finding content for all your social media channels
- Schedule posts to multiple platforms simultaneously
- See your entire posting plan at a glance to see what content you have scheduled soon
- Benefit from AI to help you write captions and hashtags
Cons of Post Planner:
- While there is a free version, you'll need to upgrade to a paid account if you want to manage more than one social media account.
Let’s discuss how to use Post Planner to take your YouTube Shorts to the next level!
Schedule posts to all your Reel platforms at once
If you want to save as much time as possible, you need the capability to schedule posts to multiple platforms simultaneously.
For example, you’re probably posting your YouTube Shorts to your Facebook page, Instagram, and TikTok as well. Wouldn’t it be nice if you could schedule to all those pages at once?
That’s exactly what Post Planner allows you to do, which is one of the key advantages it offers over using the basic YouTube Studio as described above.
Here's how to do this in Post Planner.
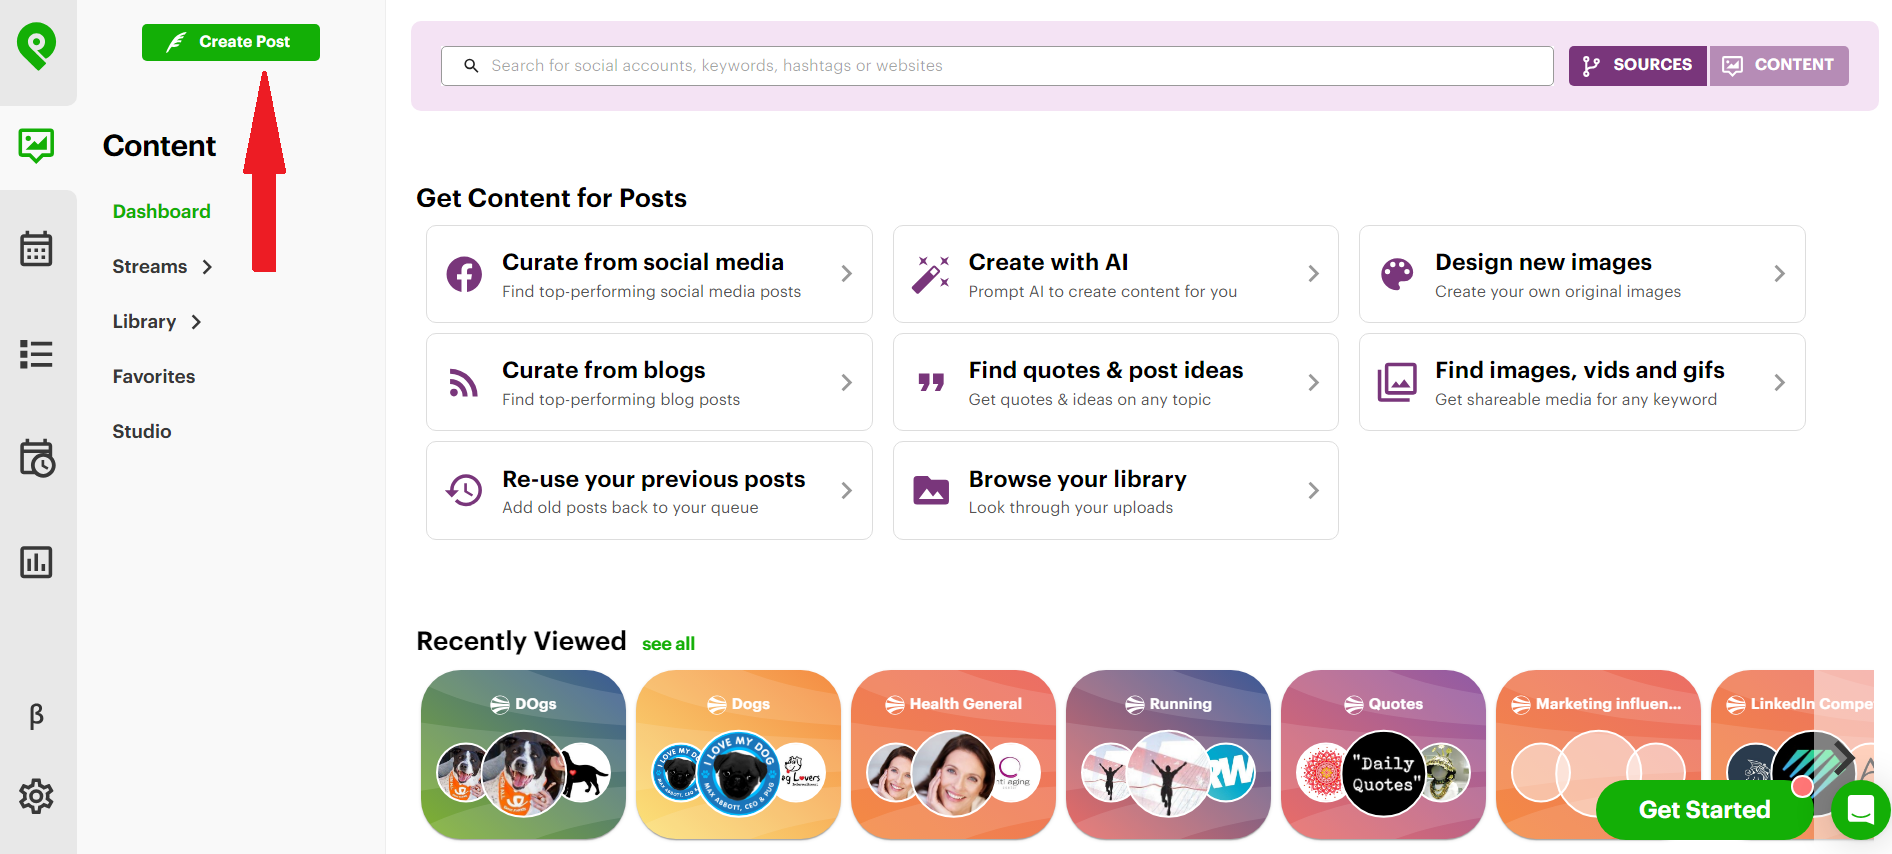
1) Click the “Create Post” button in the top left corner of your Post Planner dashboard.
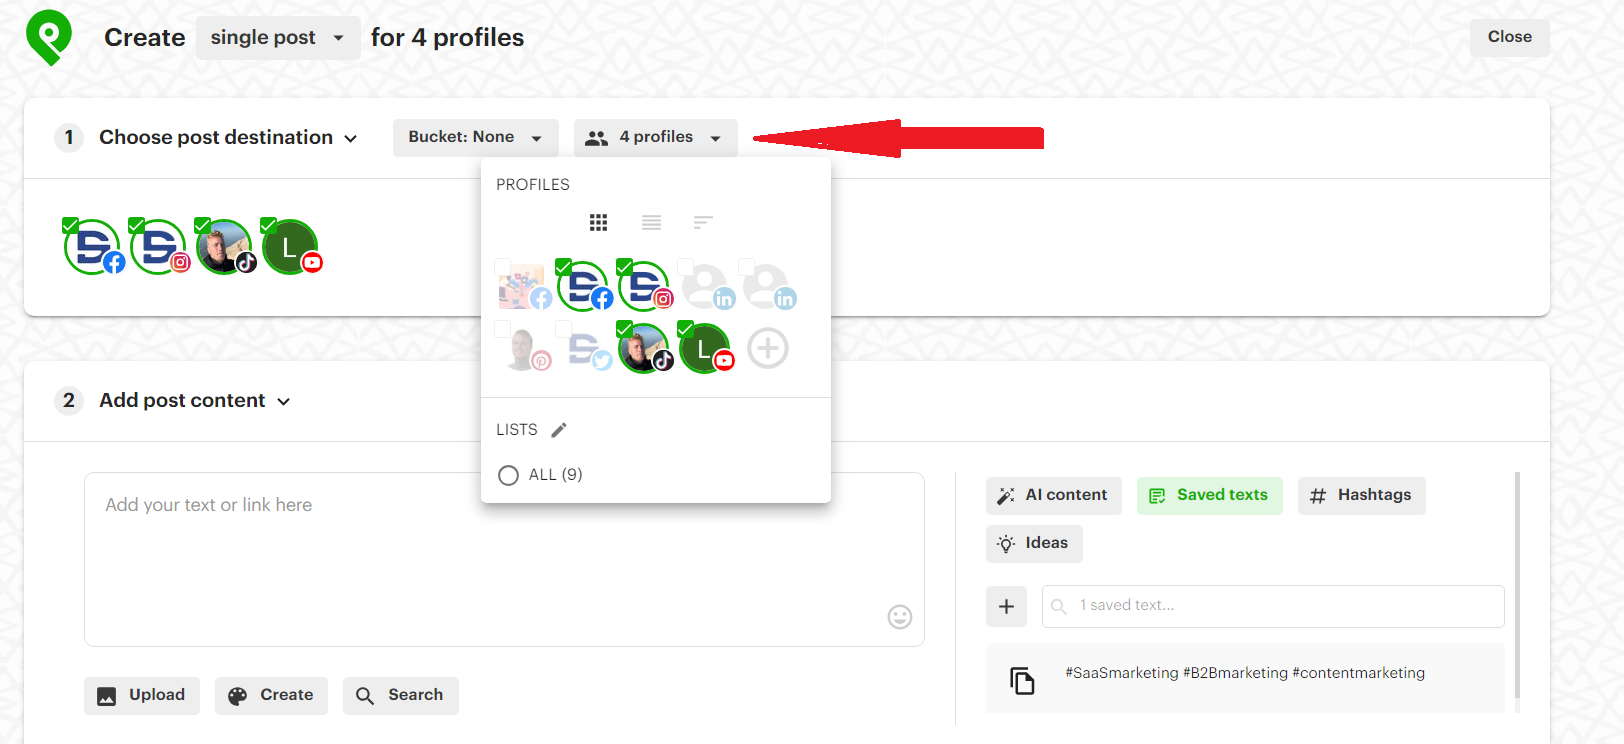
2) Select ALL the profiles you want to add your short video to using the profile selector at the top of the Content Composer.
3) Click the “Upload” button and select the video that you want to post to your social media channels.
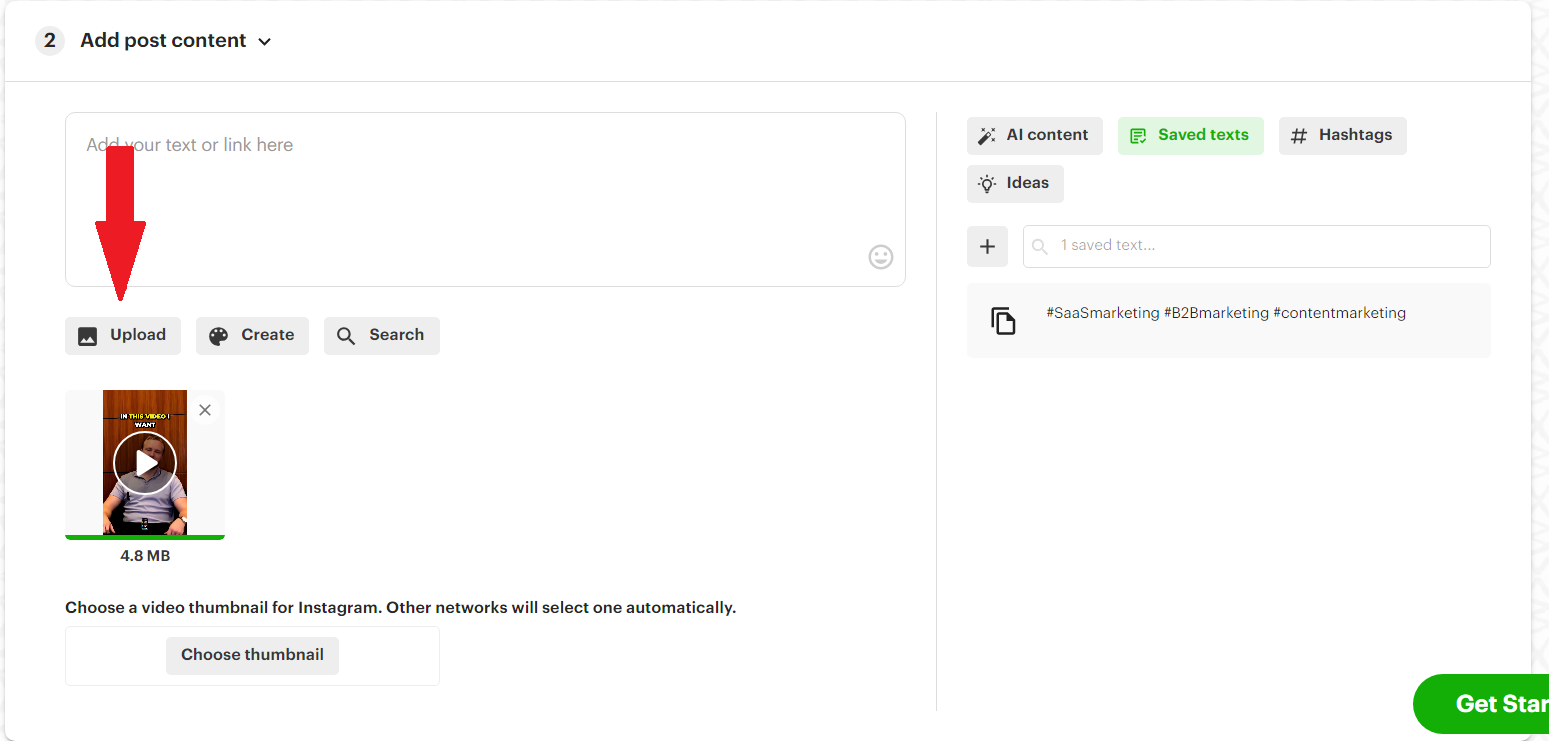
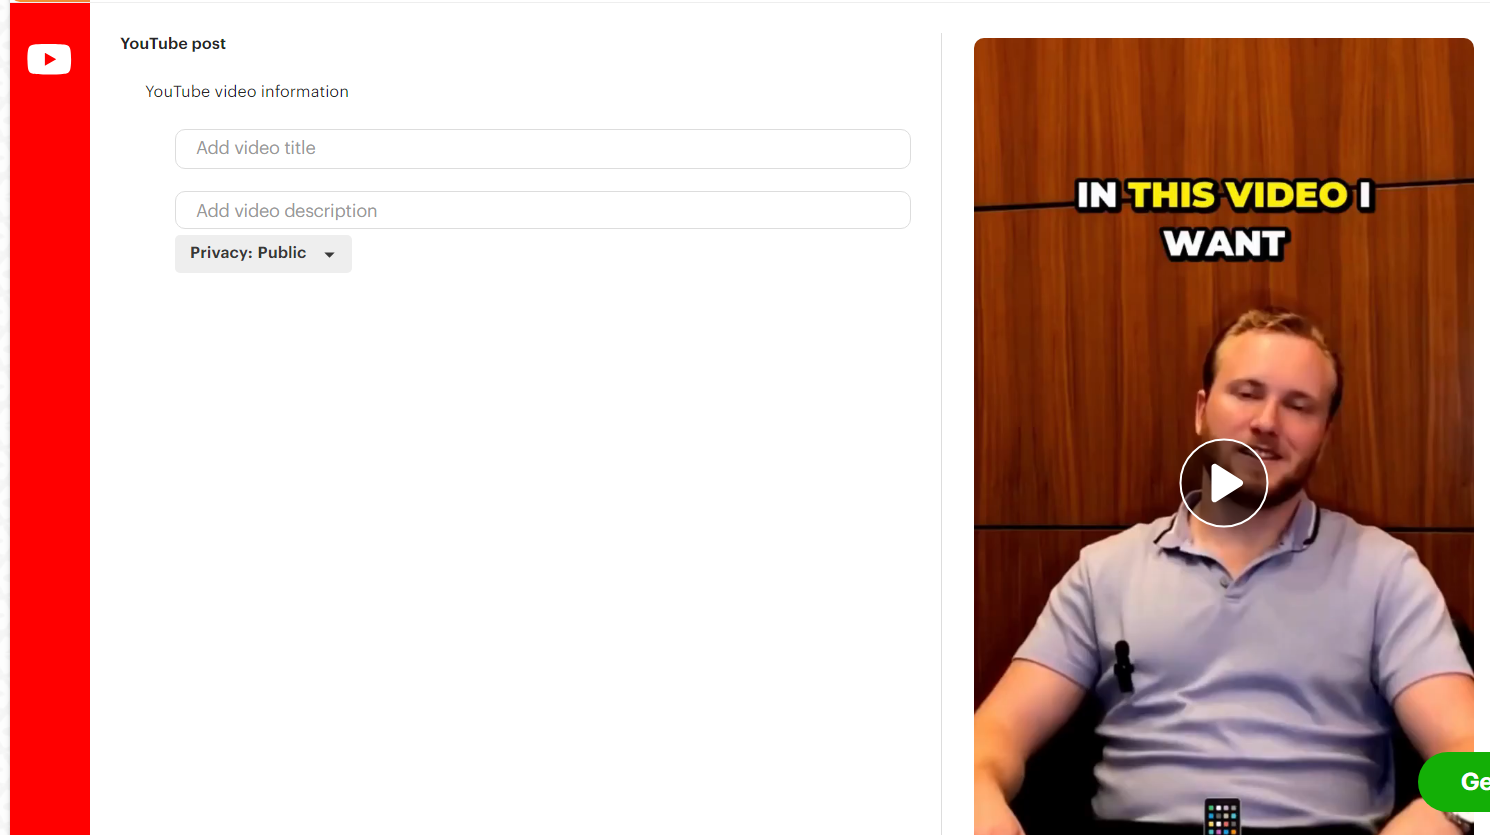
4) Post Planner will prompt you to go through each of the posts in order to optimize them for the social network where they’ll be posted. For example, you need to make sure you add a title and description for YouTube, caption and hashtags for Facebook and Instagram, etc.
5) When you’re done optimizing your posts, scroll to the bottom of the page and click “Add to queue.” (Note here that Post Planner is letting me know that my posts aren’t optimized for all the networks. If you’re missing an important detail like hashtags, make sure you go back and add them using Post Planner’s AI tools that we’ll discuss below!)
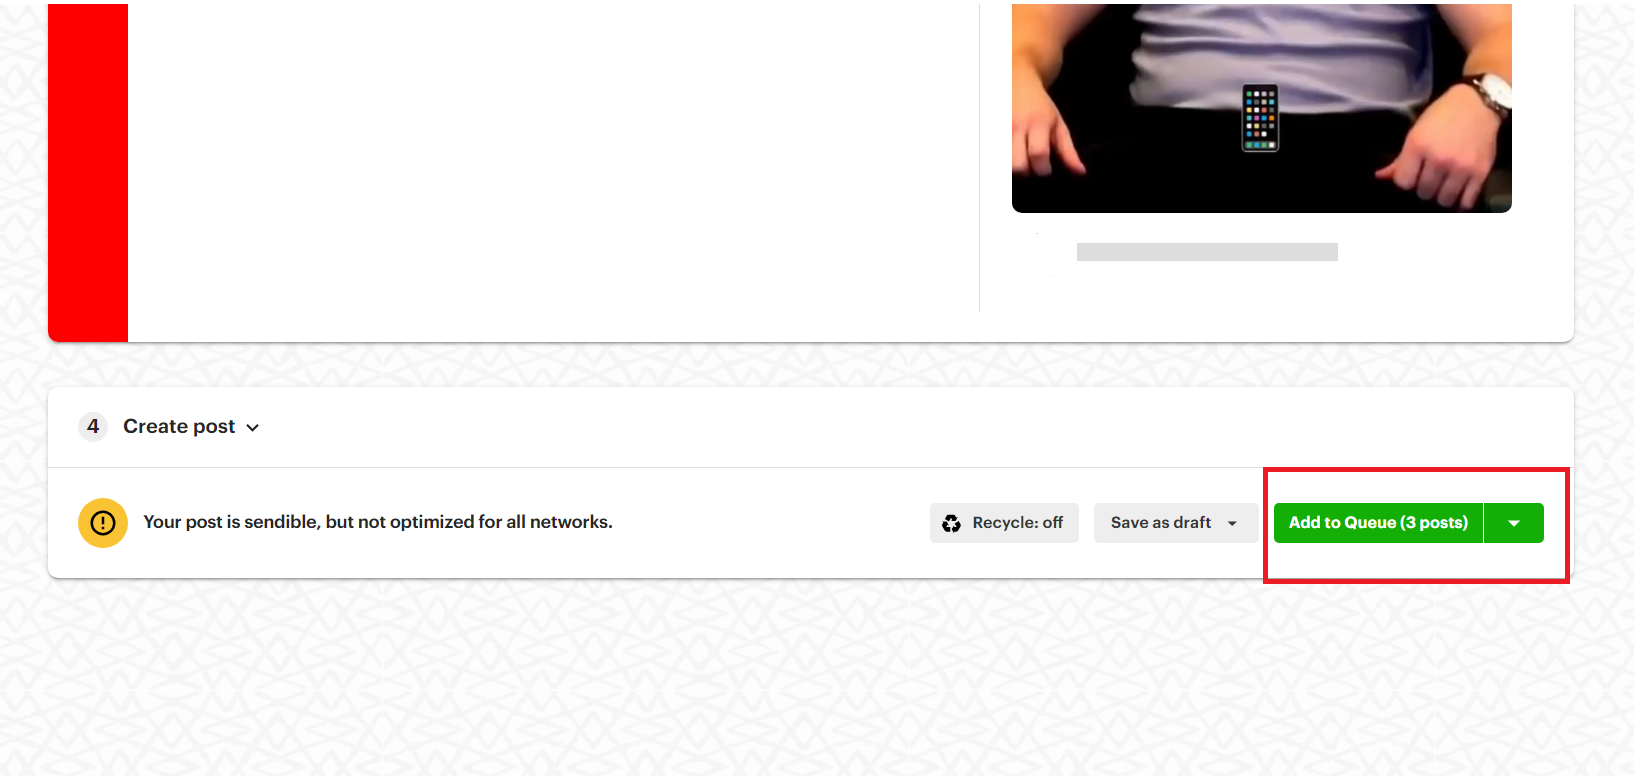
Using this method, you can quickly post your YouTube Shorts while SIMULTANEOUSLY posting the same videos to your other channels (including other YouTube channels if you’re managing multiple!). This can save you tons of time by streamlining your process.
Use AI to write descriptions and hashtags
We mentioned above that you should optimize your posts for each network, but we haven’t talked about how to do that yet.
For example, Instagram posts with at least 1 hashtag perform more than 12% better when it comes to engagement! That means you should NEVER skip the crucial step of optimizing your posts depending on which network they go to.
There are 2 important ways to optimize your posts:
- Hashtags
- Descriptions
Post Planner offers AI tools to help you write better hashtags and descriptions in less time.
1) Click the AI content button in the “Add post content” section.
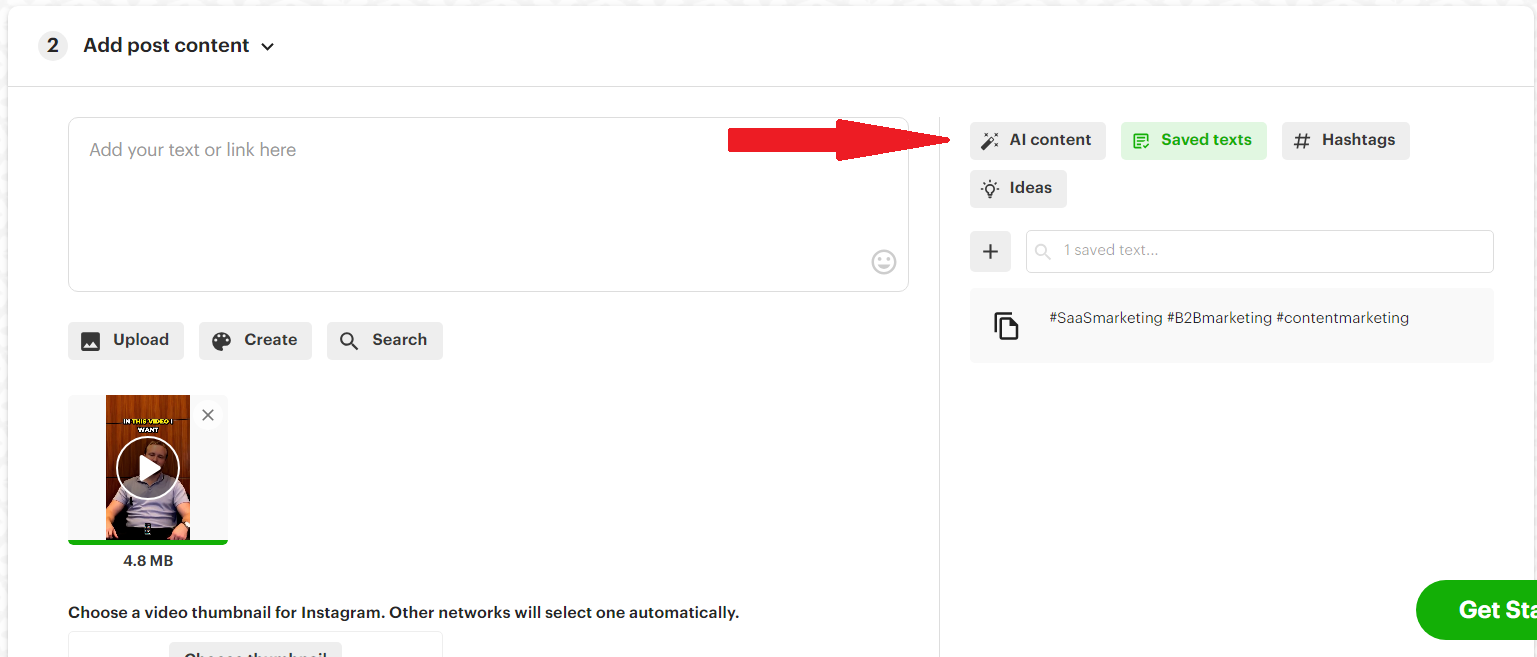
2) Enter a prompt and click how many variations you want Post Planner to come up with.
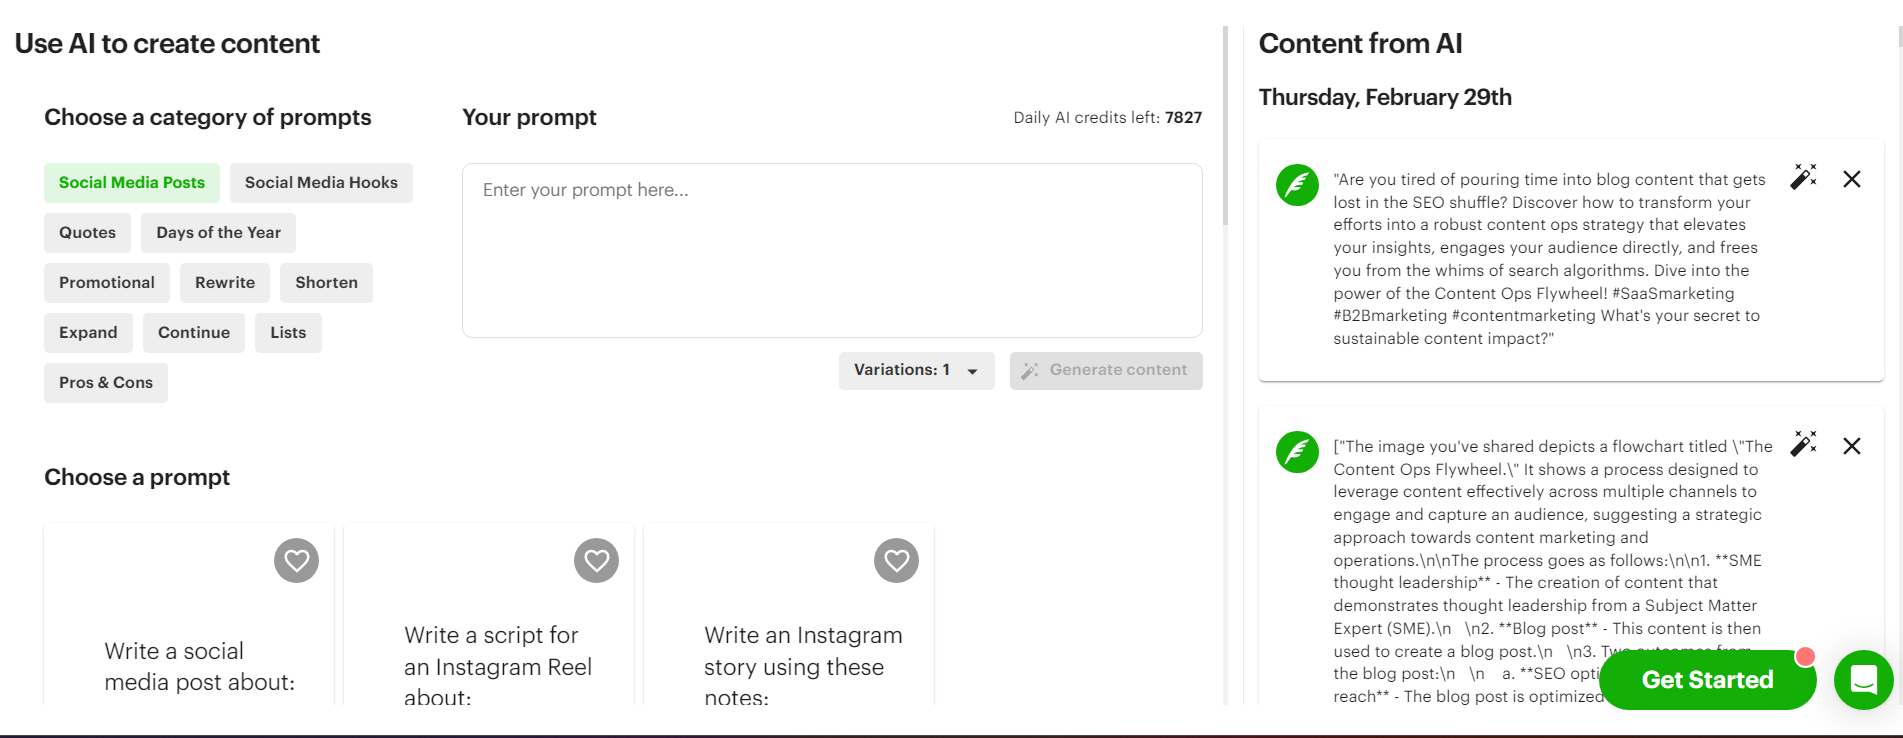
3) Copy and paste the AI description you like best into the content box. It'll automatically populate the description for each social network with that description. However, you can (and should) edit each individually to tailor it for that platform.
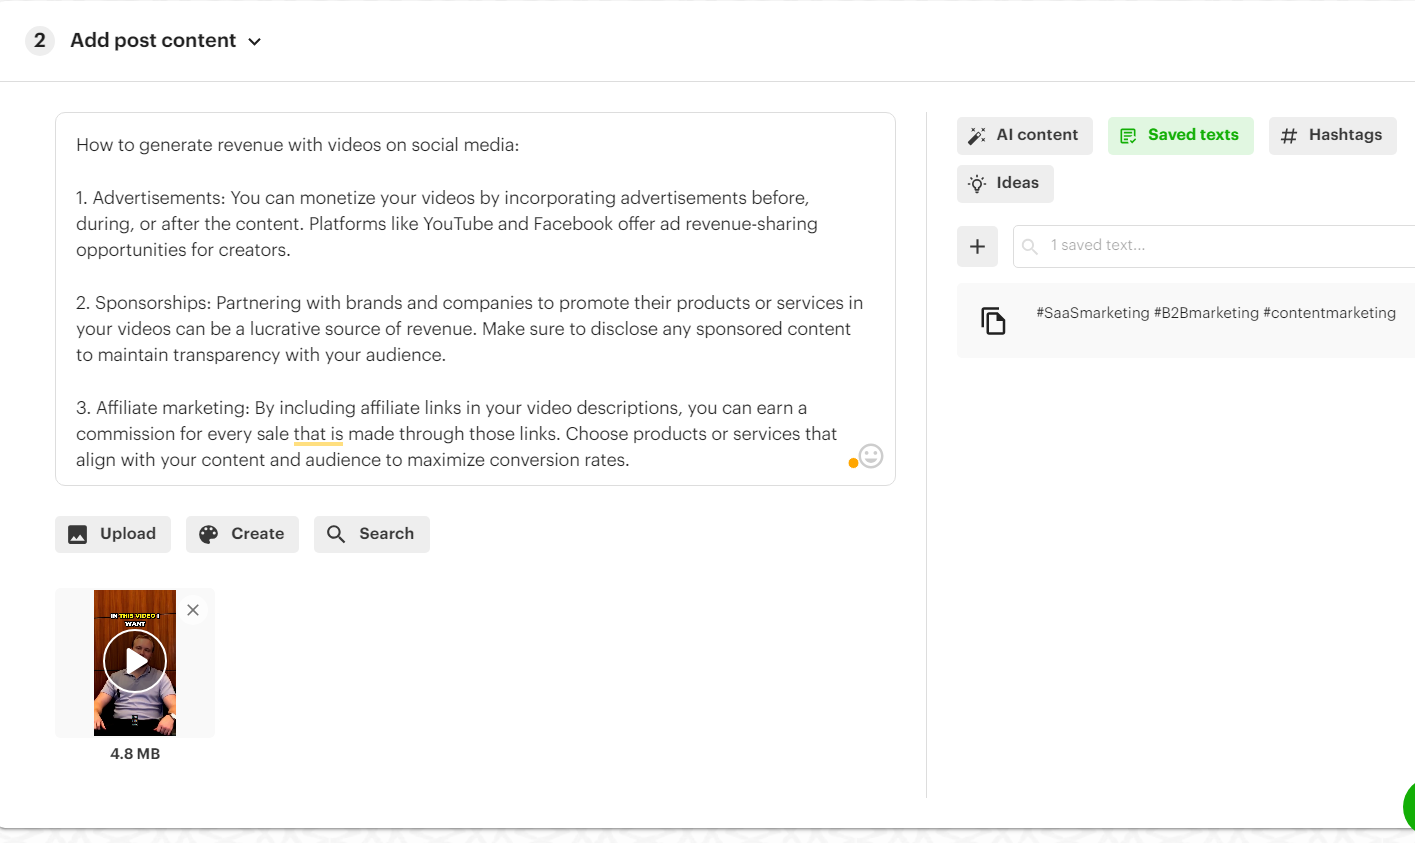
4) After adding a description, Post Planner will also generate hashtags based on the description you chose. Just click the Hashtags button and type in the main idea you want to focus on.
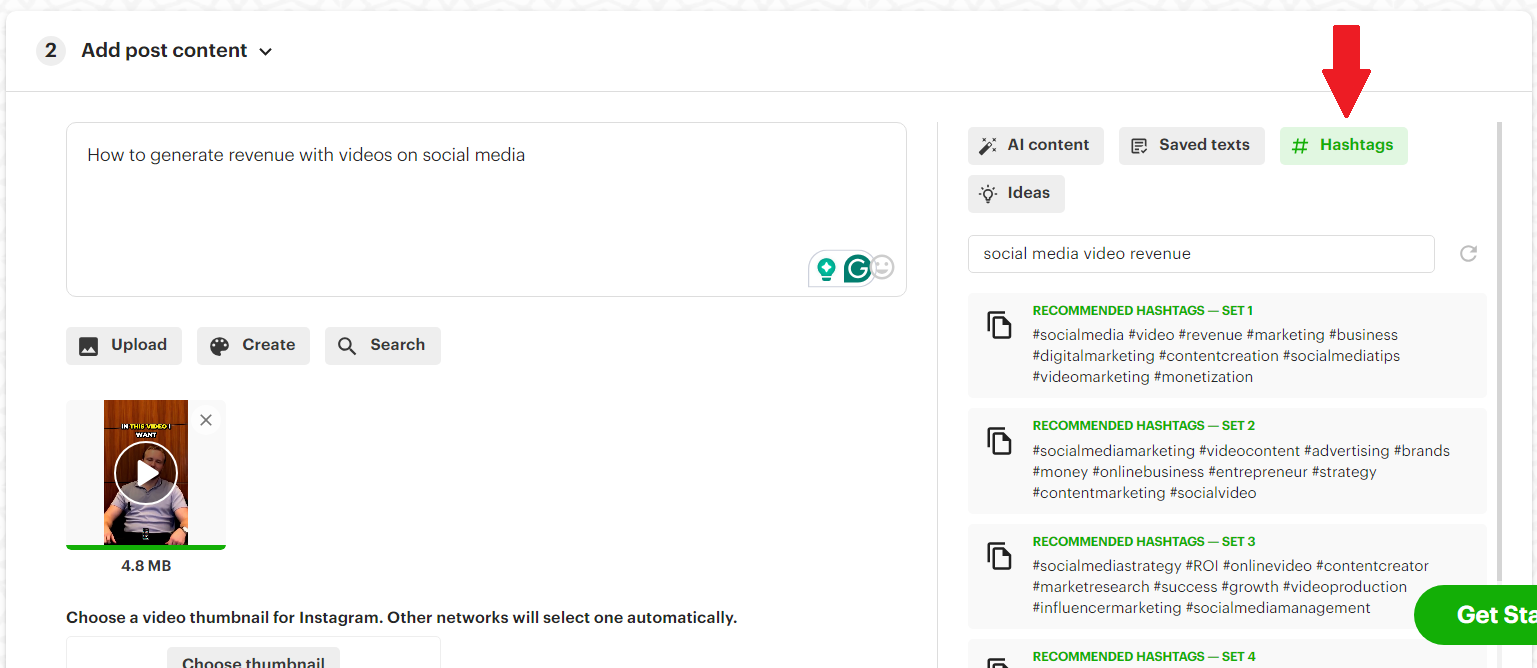
5) Click the set of hashtags you want to add to your posts!
Remember, the “Add post content” section will automatically populate all the fields for each social network below. Make sure you go into each post and individually edit it to make it perfect for your followers on that specific network!
Reschedule your highest-performing Shorts
After posting for a while, you'll inevitably have a few videos that outperform all the rest.
Don’t let that engagement go to waste! Instead, you should cycle those videos back through your content plan to cash in on that engagement a second (or third, fourth, etc.) time.
This is easy to do in Post Planner.
1) Click the “History” tab, which is where analytics are housed on Post Planner, on the left-side toolbar.
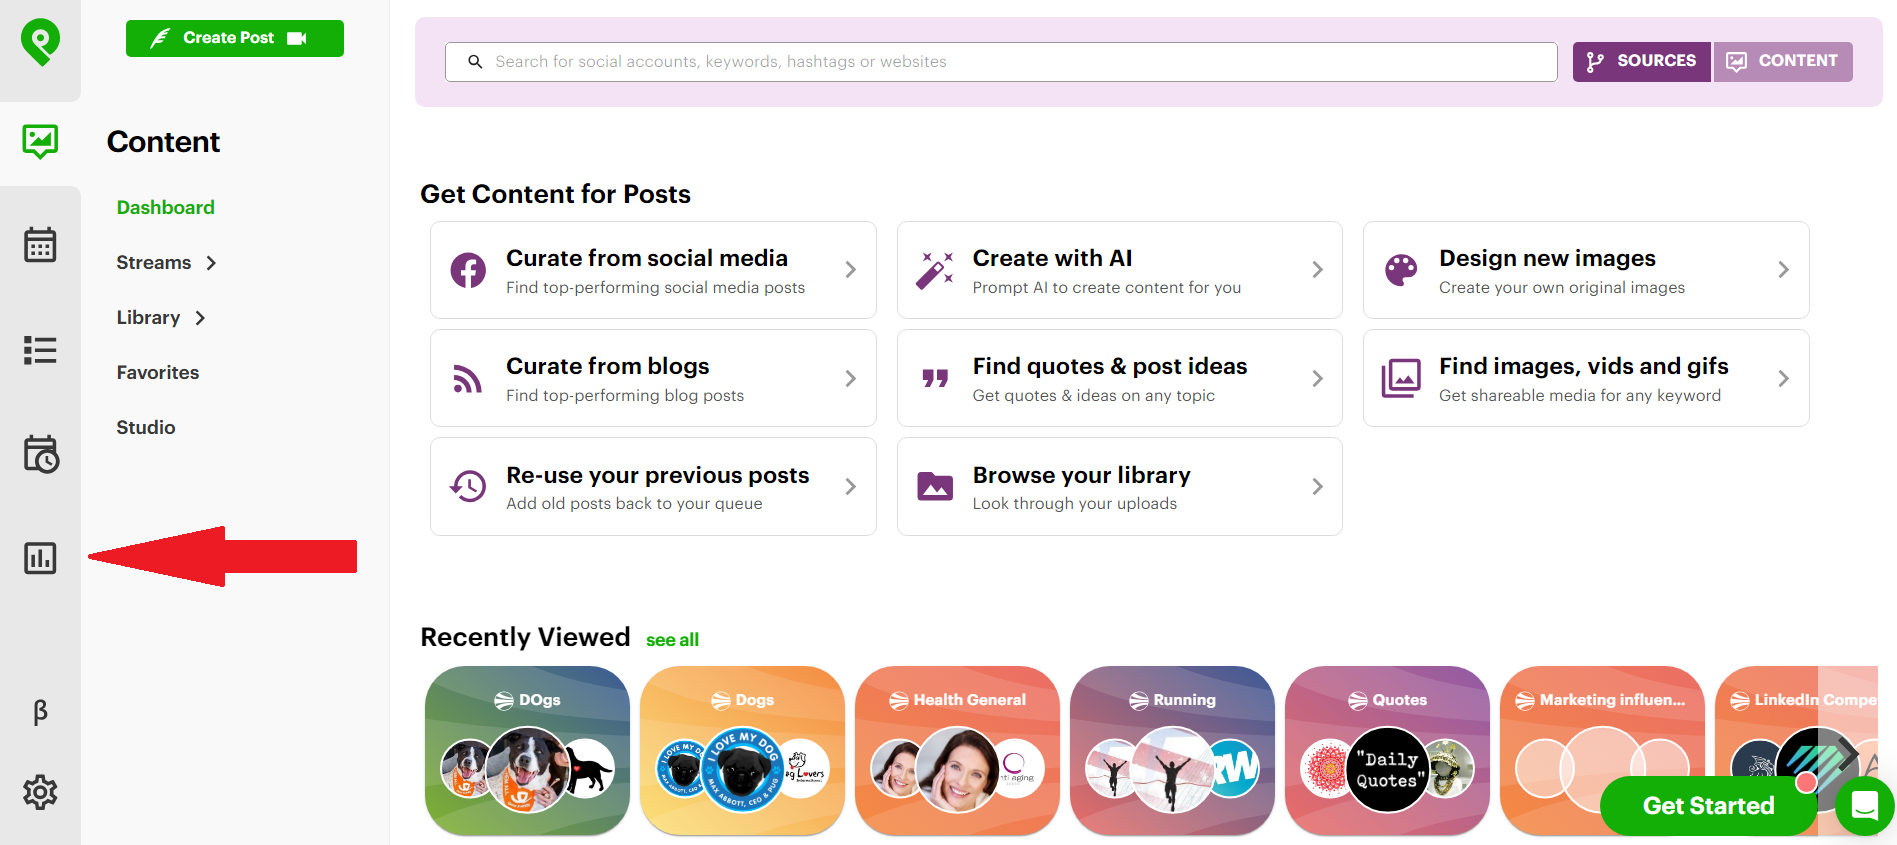
2) Scroll down until you find a post that performed well, then click the 3 dots next to it, then click “Re-queue.”
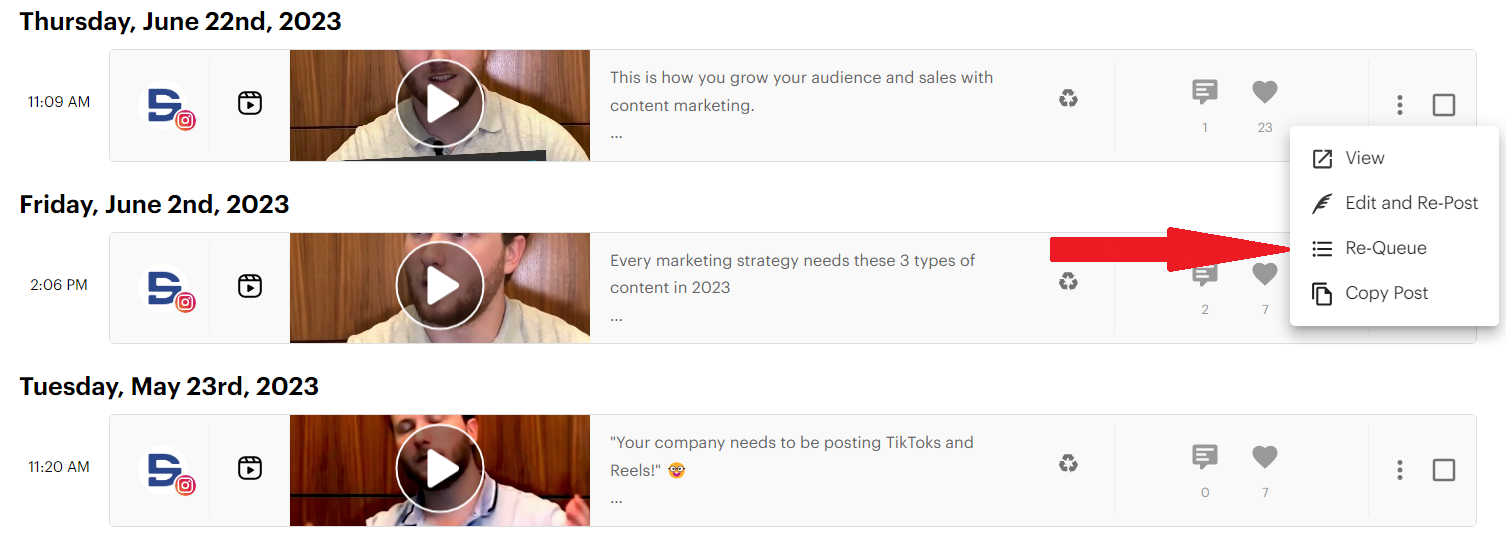
Post Planner will automatically add that video back into your future content plan on all relevant social media channels, meaning you just got yourself a high-engagement post for the cost of 3 clicks!
How to make a great YouTube Short
In the past few years, YouTube Shorts have emerged as a powerful tool for creators to engage audiences quickly and creatively.
Unfortunately, the benefit of YouTube Shorts means that they’ve quickly become a battleground for viewers’ attention.
These bite-sized videos, lasting only 60 seconds or less, can capture attention and leave a lasting impact (If done right). They also have the potential to hurt your chances with your audience if done poorly.
Before we wrap this article up, let’s explore 6 strategies to ensure your YouTube Shorts stand out and make a lasting impression.
1. Master the hook
The first few seconds of your YouTube Short are CRITICAL.
Viewers decide whether to continue watching or scroll away based on the first few things they hear and see when they scroll to your video.
Think about it – how often have you watched 3 seconds of a YouTube Short only to realize it had nothing to offer you, causing you to scroll away?
To avoid this problem with your Shorts, craft a compelling hook that instantly makes your viewers realize that your video is going to offer them something valuable:
- Pose an interesting question
- Introduce exciting or interesting content
- Present captivating visuals to instantly grab attention
A strong hook sets the tone for the entire Short and encourages viewers to stay engaged instead of scrolling away.
2. Don’t use the whole minute (keep it short and sweet)
While YouTube Shorts allow for up to a minute of content, it's essential to keep them concise and focused.
On the other hand, you shouldn’t make your Short so short that it can’t communicate anything of value.
In other words, aim for brevity AND impact.
Most experts agree that you should aim for something about halfway between the minimum of 15 seconds and the maximum of 60 seconds.
25-35 seconds is a great target, but not set in stone. If you need a few extra seconds to make your point, that’s more important than hitting an arbitrary time goal.
3. Only post it if it’s useful
I’ll occasionally scroll on YouTube and come across a video of some random guy teaching something about his niche. The video itself might look great, and he might sound knowledgeable.
The only problem is that I reach the end of the video and realize I didn’t learn anything new. The whole video was a waste of my time.
Before hitting the upload button, ask yourself: Is my YouTube Short providing value to my audience?
Whether it's entertainment, education, or inspiration, ensure that your Short serves a purpose and offers value. Users are FAR more likely to engage with content that adds value to their life.
If the answer is no, DON’T post it! Go back to the drawing board and rework the video until it offers value.
4. Make high-quality shorts
Even though YouTube Shorts are concise, you should never compromise on quality.
Like videos with a poor hook, low-quality videos are an instant turn-off to people who may have otherwise watched and benefitted from your post.
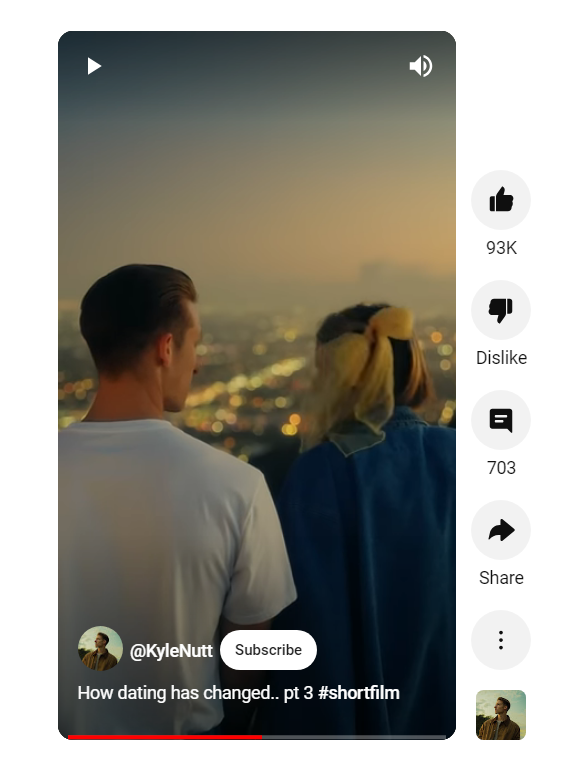
Invest time and money into proper lighting, clear audio, and sharp visuals. Professional-looking shorts not only enhance the enjoyment of watching your video, but they also reflect positively on your overall channel (and your business).
Notice how the Short below has excellent lighting and a stunning location to captivate its audience and deliver its story.
If you don’t have the skills and can work it into your budget, hire an editor to make your videos look amazing. Otherwise, invest time into learning how to make your videos look like they were done by a professional.
5. Use a variety of visuals
I’m sure you have a lot of great stuff to say, but nobody wants to watch a video of you just talking without any added visuals. More than likely, they’ll just scroll to the next video (meaning you just lost your chance with that potential customer).
To help solve that issue, keep your audience visually stimulated by including a variety of shots, graphics, and transitions.
Even something as simple as captions or cuts to a couple of different shots can go a long way toward making your Shorts easier and more enjoyable to watch.
Experiment with various visual elements to maintain interest throughout the Short until you can settle on a visually appealing style that captures your viewers’ attention and keeps it.
6. Post it at the right time
Timing can significantly impact the success of your YouTube Short.
In other words, WHEN you post – not just WHAT you post – can affect how well that video performs.
To ensure that your post performs as well as possible, analyze your audience's demographics in YouTube Studio analytics and try to identify peak times when they're most active on the platform.
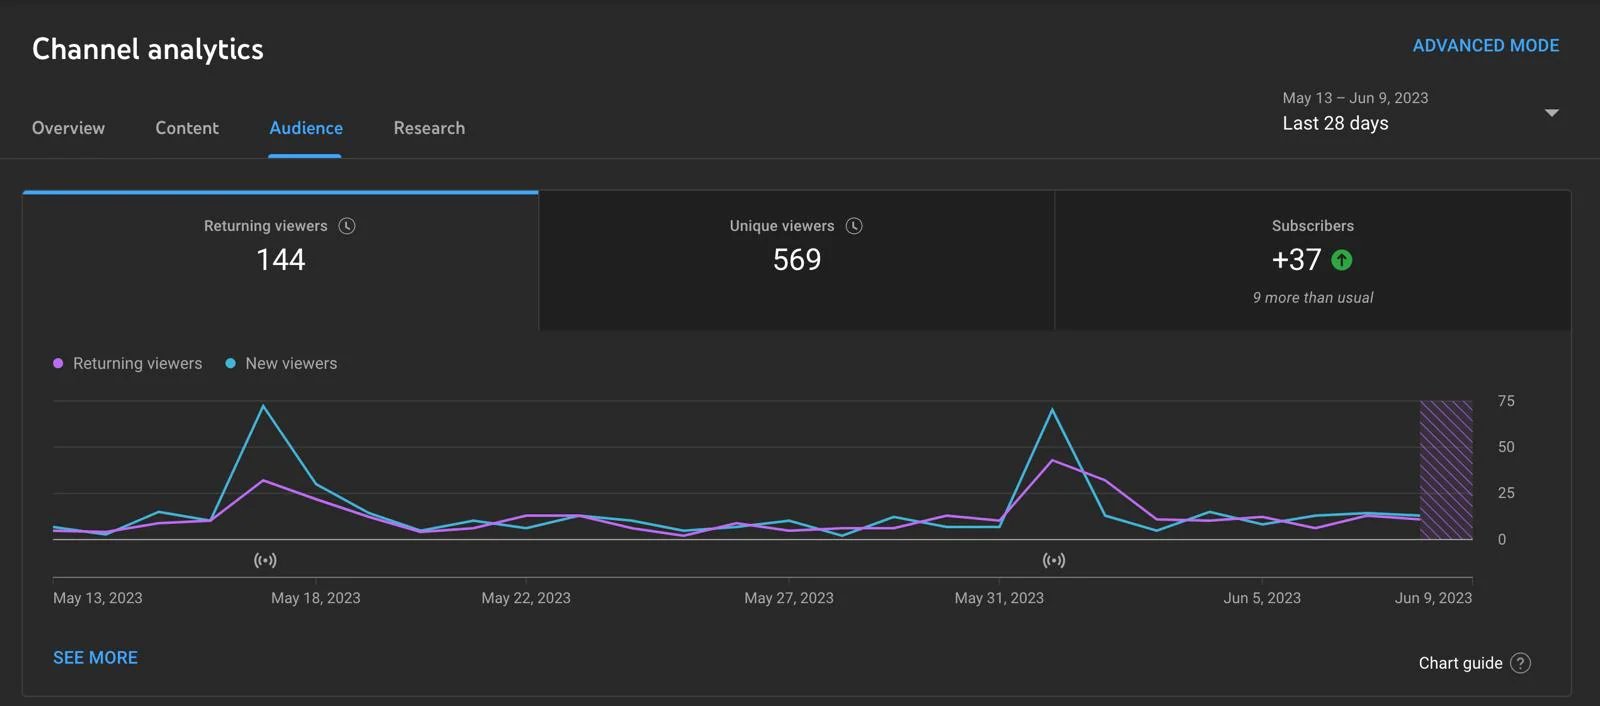
The best way to find out when your audience is active is simply to post at a few different times of the day and week until you find out which videos are getting the most engagement.
Once you find out that information, simply aim to post on those days and times to maximize engagement.
FAQ
Does scheduling YouTube Shorts affect views?
YES! Scheduling your YouTube Shorts will help you get MORE views because you will be able to post more consistently, and you’ll be able to use the time you’re saving to improve your video quality. There are no negative effects to scheduling your YouTube Shorts.
What is the best schedule to post YouTube Shorts?
It depends on your audience. Make sure you look at your audience activity to see when they’re most likely to watch and engage with your videos, then post your Shorts at those times. This process takes some trial and error, but it’s worth it!
Can you schedule YouTube videos?
Not only CAN you schedule YouTube videos, but you SHOULD. You can schedule YouTube videos using YouTube Studio or a 3rd party software like Post Planner.
Ready to start scheduling YouTube Shorts like a boss?
YouTube is hard, but you can make it easier on yourself by scheduling your videos and Shorts ahead of time.
Scheduling videos saves you time, gives you plenty of time to think and strategize about future content, and helps you maintain consistency (which is the key to growing a YouTube channel).
Follow the tips in this article, and you should see quick growth in your YouTube channel.
Don’t forget to sign up for a free Post Planner account to see how much YouTube scheduling can help you grow online!
Good luck!


No Comments