
 Have you ever posted a "Good morning!" on your Facebook Page, only to realize that -- oops! -- morning in your part of the world isn't morning everywhere?
I have.
For example, I'm in California. So if I post a "Good morning!" on the Post Planner fan page at 7am California time -- then our fans in the UK see the post at... yes, 3pm!
Not exactly top of the morning.
Even worse, our fans in India & Australia see the post at 7:30pm & midnight, respectively.
Not good.
So is there a way to fix this? Is there a way to say "Good Morning" to fans worldwide -- during their actual morning hours?
Turns out there is. ;)
Solution = Targeting + Time Zones
The solution involves a combination of:
- geo-targeting your posts
- converting times according to time zones
- scheduling your geo-targeted posts for the converted times
You can do this manually in Facebook -- which takes a fair amount of time & effort -- or you can do it in a few clicks with Post Planner.
Either way, it's probably worth your time -- so let me show you how it's done.
2 Options for Post Targeting
Before I show you how to post at the same time-of-day in different time zones, I want to take a step back & make sure you understand the different targeting options in Facebook.
Facebook offers 2 options for post targeting:
- News Feed targeting -- limits the visibility of your post ONLY in the News Feed
- Post Gating -- limits the visibility of your post across ALL of Facebook (including the News Feed)
If you want to target a post on Facebook, you need to choose between these 2 options.
You have to tell Facebook either to:
- show your post ONLY to certain people in the News Feed... or
- show your post ONLY to certain people across the entire social network -- including the News Feed, your Page Timeline & everywhere else
Here's where you access the 2 targeting options in Facebook:
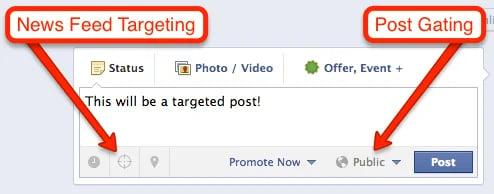
Now let's talk about each of the 2 targeting options in more detail.
1. News Feed Targeting
News Feed targeting limits your post's visibility ONLY in the news feed.
Example: If you use News Feed Targeting to target a post to people in France:
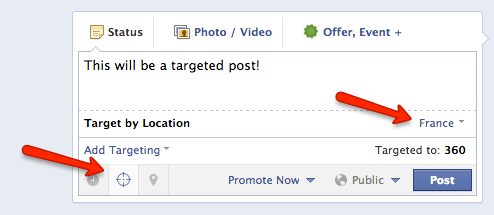
Then:
- ONLY people living in France will see your post in their news feed
- But -- and this is a BIG "but" -- EVERYONE (no matter where they live) will see your post when visiting your page's Timeline
- And -- and this is a HUGE "and" -- EVERYONE who has turned on notifications for your page (no matter where they live) will get a notification for your post
2. Post Gating
Post gating is more comprehensive than News Feed targeting -- because it limits the visibility of your post EVERYWHERE in Facebook.
Example: If you use Post Gating to target a post to people in France:
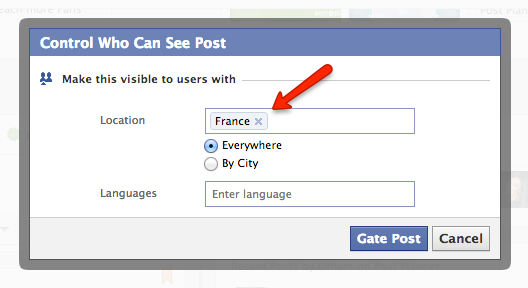
Then:
- ONLY people living in France will see your post, no matter where they are on Facebook
- ONLY people living in France (who have turned on notifications for your page) will get a notification for your post
Again, Post Gating is the more comprehensive of the 2 targeting options -- because it hides your post from the non-targeted audience *no matter where they are* on Facebook.
With Post Gating, the non-targeted audience will NEVER see your post.
My Recommendation: Use Post Gating
I recommend using Post Gating in most cases -- especially when employing the tactics described in this blogpost.
Why?
Because if you follow my instructions here, you'll be publishing several posts with the exact same content to your page -- each one targeted to a different location.
The last thing you want is for fans to visit your page & see the same post repeated down the Timeline.
And the VERY last thing you want is for fans (who have turned on notifications for your page) to get notifications for 8 posts with the exact same content!
These things will happen if you use News Feed Targeting instead of Post Gating.
The solution: just use Post Gating!
One Last Thing
Please remember you can only use Post Gating for these targeting categories:
- Location
- Language
You CANNOT use Post Gating for Facebook's other targeting categories:
- Gender
- Relationship Status
- Educational Status
- Interested In
- Age
These 5 can only be used in News Feed Targeting.
But since we're mainly talking about locations & time zones in this blogpost, not being able to target by Gender, Age, etc. isn't important.
Now... let's get to it!
Spanning the World
To start, let's make it clear exactly what we're trying to do.
Our Goal: We want to publish a post on our fan page that will be seen by fans across the world *during their morning hours* -- no matter what time zone they're in.
Our post will have the following content:
- Text: "Good morning, Post Planners! Here's a great article to start off your morning."
- Link: A Crash Course in Facebook Marketing
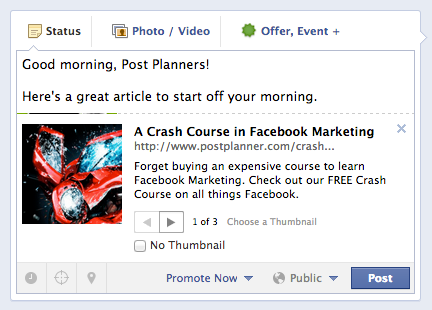
So... how do we make sure this post gets published in the morning -- and that fans around the world see the post in the morning, no matter which time zone they're in?
Step 1: Segment your Fans into World Regions
Let's start by segmenting our fans into exclusive regions of the world.
Here are the 8 regions I use:
- North America -- US, Canada, Bahamas, Jamaica
- South America -- Mexico, Dominican Republic, Puerto Rico, Guatemala, Belize, Honduras, Nicaragua, El Salvador, Costa Rica, Panama, Columbia, Venezuela, Ecuador, Peru, Bolivia, Brazil, Paraguay, Uruguay, Argentina, Chile
- UK, Ireland, South Africa
- Europe -- Portugal, Spain, France, Belgium, Netherlands, Luxembourg, Germany, Switzerland, Austria, Italy, Denmark, Norway, Sweden, Finland, Estonia, Latvia, Lithuania, Belarus, Ukraine, Russia, Georgia, Poland, Czech Republic, Slovakia, Hungary, Slovenia, Croatia, Bosnia Herzegovina, Serbia, Montenegro, Romania, Bulgaria, Macedonia, Albania, Greece
- Middle East -- Morocco, Algeria, Tunisia, Libya, Egypt, Turkey, Armenia, Azerbaijan, Lebanon, Palestine, Israel, Jordan, Saudi Arabia, Yemen, Iraq, Kuwait, Bahrain, Qatar, United Arab Emirates, Oman
- India+ -- India, Pakistan, Afghanistan, Nepal, Bhutan, Bangladesh, Sri Lanka
- East Asia -- Indonesia, Malaysia, Singapore, Hong Kong, Taiwan, Philippines, China, Japan, South Korea, Thailand, Laos, Cambodia, Vietnam
- Australia, New Zealand
I chose these regions based on a combination of location & language -- as well as the geographical distribution of the fans on my fan page.
Also, I tried to make sure each region doesn't span more than 4 time zones.
** Note: to see the geographical distribution of your fans, go to your page Insights & click "Likes"
Step 2: Assign Each Region a Time Zone
Here are the time zones I assigned to my 8 world regions:
- North America -- San Francisco, or UTC -7
- South America -- Santiago, or UTC -3
- UK, Ireland, South Africa -- London, or UTC +1
- Europe -- Paris, or UTC +2
- Middle East -- Cairo, or UTC +2
- India+ -- New Delhi, or UTC +5:30
- East Asia -- Singapore, or UTC +8
- Australia, New Zealand -- Sydney, or UTC +10
** Note: Daylight Savings has been applied to the time zones where applicable
Step 3: Choose Posting Time & Convert Time Zones
Our post is a morning post -- so let's publish it at 7am.
But remember -- we want the post to publish at 7am in each of our regional time zones.
So now we have to figure out:
- what 7am in Santiago equals in California time
- what 7am in London equals in California time
- and so on...
We can use this awesome time zone converter to make these conversions.
Here's what I got:
- North America -- 7am
- South America -- 3am
- UK, Ireland, South Africa -- 11pm
- Europe -- 10pm
- Middle East -- 10pm
- India+ -- 6:30pm
- East Asia -- 4pm
- Australia, New Zealand -- 2pm
Now all we have to do is create the 8 posts, target them & schedule them for the above times.
Step 4: Create, Target, Schedule
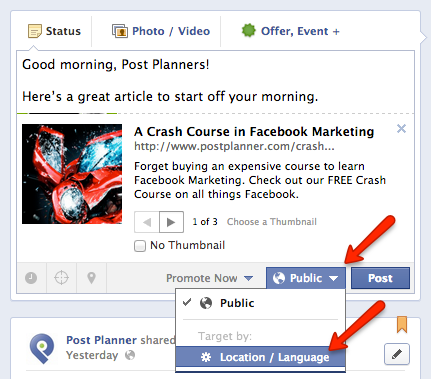
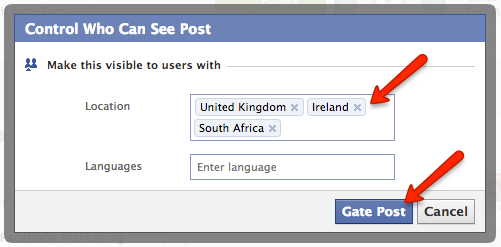
We already know how to create the post. Here's how we target it using Post Gating:
- Click "Public" then "Location/Language"
- Add the countries in the region and click "Gate Post"
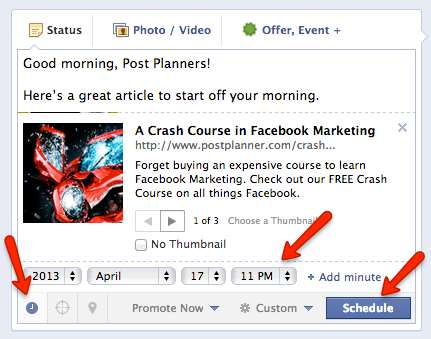
Then it's just a matter of scheduling the post at the right time, so it publishes at 7am in the targeted region.
I know from my time conversions above that 7am London time equals 11pm California time.
So I schedule the post for 11pm:
Voila! This post is done.
Now we just have to repeat the process for each of our 7 remaining regions.
Once we do that, we'll have 8 identical posts that are:
- targeted (using Post Gating)
- scheduled to go out at 7am in each regional time zone
Then we can kick up our feet & sip wine while our posts span the world.
But... Isn't There an Easier Way?
I was thinking the same thing. ;)
Let's face it -- the above process takes A LOT of calculating, typing & clicks.
For the South America region alone, we have to manually enter 20 countries every time we target a post.
And for Europe, that number is 36!
In fact, the whole thing wouldn't be so bad if we could just add the countries to the regional Target ONCE -- and then save the Target for later use.
And it wouldn't be so bad if we could just create our post ONCE -- instead of having to recreate it 8 times.
And it wouldn't be so bad if we could just make the time conversions AUTOMATIC -- so we don't have to calculate & convert time zones every time.
Yeah... if these things were possible, then it wouldn't be so bad. In fact, it would be pretty easy.
Damn!... someone should make an app for that.
Guess what?
Yep, we already did. It's called Post Planner.
Yep, if you use Post Planner to target & schedule your posts, you can
- create & save your regional Targets -- to be selected anytime in a single click
- write your post only once -- Post Planner automatically generates a unique post for each regional Target
- avoid time zone conversions -- Post Planner converts & schedules for you!
Not bad, eh?
Now let's break down the above process in Post Planner -- so you can do it yourself.
How to "Time Zone Target" in Post Planner
The first thing we need to do is install the app here
Once we have it installed & we've signed up to the Guru App, we can head to our app & get started.
Preparation: Create & Save Regional Targets
Here's where we add the countries in each region and save them as a Target.
All we have to do is:
- Click "Target" and then "Create New Target"
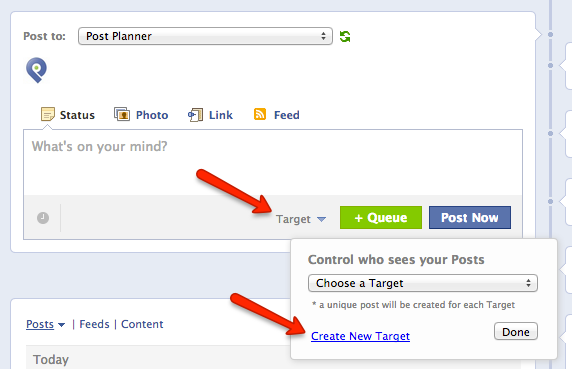
- Add countries & give the Target a name
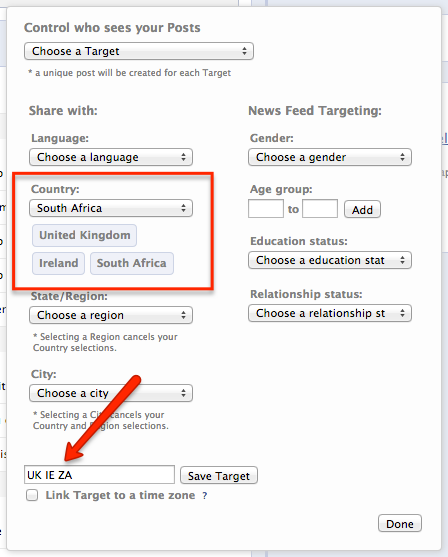
- Click "Link Target to a time zone" & choose a time zone
- Click "Save Target"
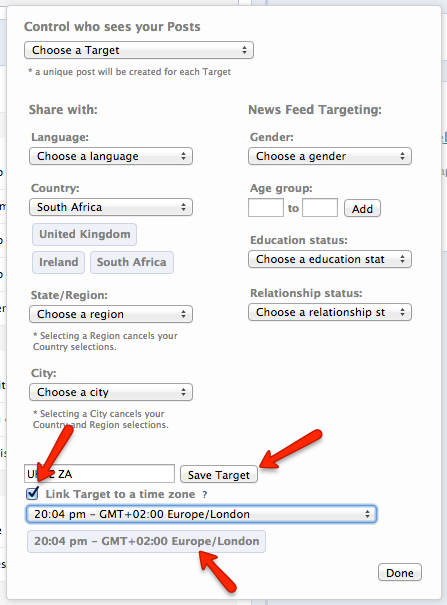
- Repeat this process for each of our 8 world regions
Yes, this IS kind of a pain in the ass.
But remember -- you only have to do it ONCE! Then your targets will be saved & you can use them anytime in a couple clicks.
Once we've created our custom regional Targets, we start scheduling our posts.
Step 1: Create Post
Here's where we add the text & attach the link.
Step 2: Select Regional Targets
- Click "Target" & select our 8 saved Targets
- Click "Done"
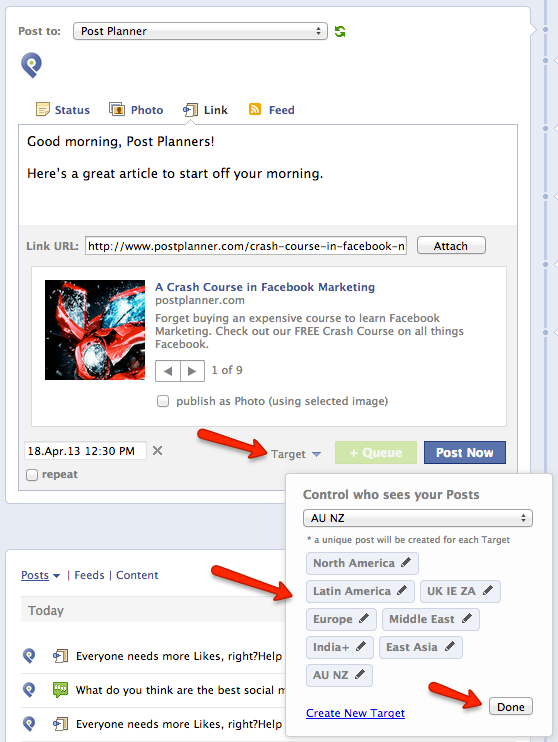
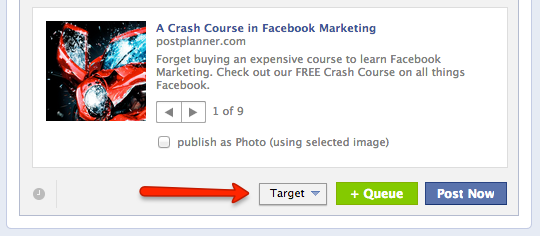
After clicking "Done" you'll see a square around the "Target" button that indicates targeting is turned on:
Step 3: Choose Publishing Time & Click "Schedule"
Again, you don't need to worry about any time zone conversions here. Post Planner converts the times automatically.
Just open the scheduler & choose 7:00am.
Then click "Schedule" and watch as 8 unique posts appear in your plan:
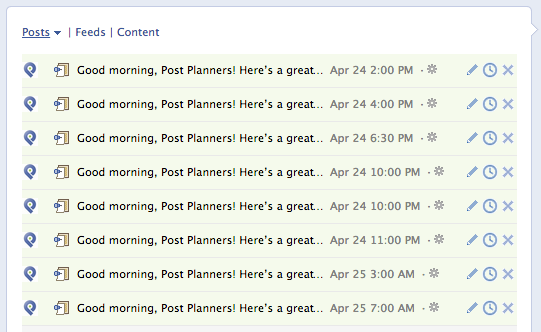
Notice the publishing times have been automatically converted.
**Note: You can hover over the gear icon to see the targeting on each post.
Step 4 (optional): Translate Posts
If we really want to go the extra mile (or kilometer) & delight our worldwide fans -- not to mention increase clicks & engagement -- then we should probably translate our targeted posts into the language most relevant to each region.
In the case of my posts, it really only makes sense for to translate one of them -- the post targeted to Latin America. Let's translate it to both Spanish & Portuguese.
We won't translate the other posts because the regions are either English-speaking:
- North America
- United Kingdom, Ireland, South Africa
- Australia, New Zealand
Or they have too many languages in the Target to bother with translations:
- Europe
- Middle East
- India+
- East Asia
So here's how we translate the Latin America targeted post:
- Click the pencil icon on the planned post:
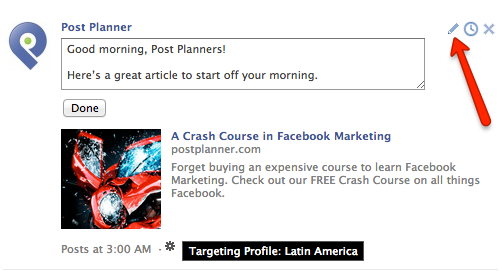
- Go to Google Translate, translate our post & then replace the English status with the translation(s)... like this:

We're Done!
Now we can kick back, chill & sip wine as our posts span the world. :)
And -- as the wine slips down our parched gullets -- we can feel content knowing that the next time we want to do this -- ie. target a post to our 8 world regions -- it will only take 37 seconds!
Or 40 tops.
Only Scratching the Surface
As you can see, this new Custom Targeting feature in Post Planner is SUPER powerful.
In fact, in this blogpost we've only scratched the surface of what it's capable of.
There are soooo many other "use cases" for it.
One obvious example is pages that don't have a worldwide following -- but rather only have fans in North America.
In that case, you can create regional Targets made up of states in the US -- and then link those Targets to the 6 North American time zones -- Alaska & Hawaii each have their own, remember. :)
Also... we didn't even mention the demographic targeting possibilities.
Yes, you CAN actually save your own custom Targets for any of these -- Gender, Age, Educational status, etc.
But remember the difference between News Feed Targeting & Post Gating we discussed above. You'll need to adjust your posting tactics accordingly.
How Does This Affect Reach?
Good question.
Actually the jury is still out on reach. I've been testing & measuring this strategy for the last month and I'll report my findings soon.
As of now, the data shows a clear increase in reach -- of about 10-20% -- when using this "Time Zone Targeting" strategy.
That said, I don't recommend using this strategy on all your posts.
For example, if you're posting a photo with the aim of getting as much worldwide engagement as possible -- you should post it as a single post without any targeting.
Same goes for statuses or vids.
But if your goal is to get click-thru on link posts -- to your blog for example -- then this Time Zone Targeting strategy is the way to go.
As I mentioned, I'm seeing higher total reach AND higher click-thru rates on our link posts using the Time Zone Targeting strategy described here.
What do you think?
Does this sound like something you could use on your page?
If so, please give Post Planner a try & let me know your results.
And definitely let me know any creative use cases you come up with for Post Planner's Targeting feature. I'd love to write about here on our blog.


ViewHide comments (4)