Going Live on Facebook is now easier than ever.
In an update that included a variety of features, Facebook announced the ability for broadcasters to go live directly from desktop.
This not only simplifies the process, but eliminates the need for third-party applications like Wirecast, OBS or BeLive.
That is... unless you're looking for more advanced features like:
- Using multiple cameras
- Add cool elements, logos and text
- Create a branded lower-third, and more.
With this latest Facebook update, live streaming is as easy as hopping on your computer and clicking the live button.
“We are rolling out the ability to go live on Facebook via a web browser to Pages. A variety of broadcast types — like daily vlogs — benefit from an easy, stable camera setup, and bringing Live to laptops and desktops will make this style of broadcasting easier.”
Before today, you had to mess with your mobile phone, camera, and a possibly shaky setting.
Ready to dive in?
Learn how you can get started with Facebook Live for desktop today!
Want to finally conquer Facebook marketing in 2017? Here's our no-fail strategy to increased results!
Facebook Live Is Here For Desktop (How To Use It)
First things first.
If you've wondered what all the hype around live streaming is about, here's the deal.
Why Use Facebook Live for Your Business?
1. Live streaming is about connection and interaction. Instead of talking at them, you’re talking with them - and in real time.Think about those days when you want to share a quick tip or a behind the scenes look into your business?
"Live streaming is about connection and interaction.Instead of talking at them, you’re talking with them - and in real time."Click to Tweet
But be careful. You never want to go in without a plan.
Per Diana Gordon, senior partner and group director of search and social at media agency Mindshare NA, you need to be prepared for the unknown and unavoidable that comes with live video.
“Live feeds are still in their infancy, so brands should be prepared to do a lot of test and learn,” she said. “Marketers need to set realistic goals, benchmark and work to grow, testing and learning along the way. Not every piece of content can and will be a winner, but that’s part of the learning process.”
2. And along the lines of saving time, recording a live stream is nowhere near the time it takes to prepare any other type of content.
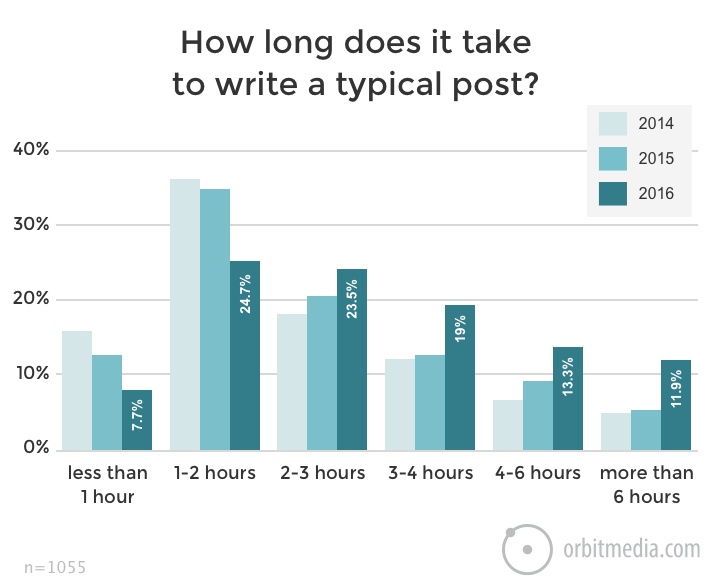
It takes a few minutes to do a Facebook Live, a lot less than it takes to create a social media graphic, post that same information, or as my friend Andy Crestodina found:
Much less time than it takes to write a blog post. 😳
"The average blog post takes 3 hours 16 minutes to write."
Yikes! Give yourself some of your day back and go live instead.
Before You Go Live on Facebook
Set yourself up for success!
Prepare before you go live.
1. Pick the perfect topic and description
2. Plan ahead - create an outline - detail out what you’ll talk
- Focus on the 3 C’s of Video Marketing:
- Content
- Context
- Clarity
3. Find a comfortable location
4. Check your connection if on wifi
5. Promote, promote, promote
How to Go Live on Facebook
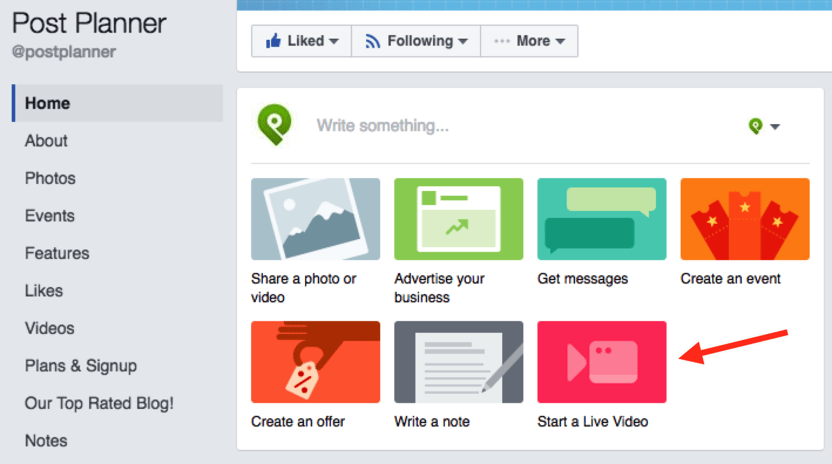
Step 1: Go to Your Facebook Page
From here, you’ll be able to go live on any page you admin.
Under your cover photo, you'll see many new options. Choose "Start Live Video."
Step 2: Say Something About Your Live Video
Just like a post, your live video needs context.
Add your description and share what your video is all about.
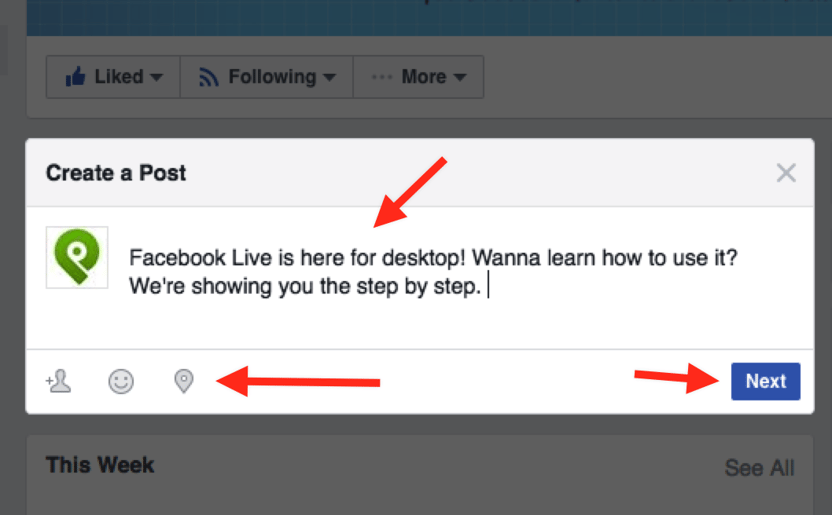
You can also:
- Tag people
- Add an emotion ( what you’re doing or how you’re feeling)
- Check in at your current location
When you’re done, click Next.
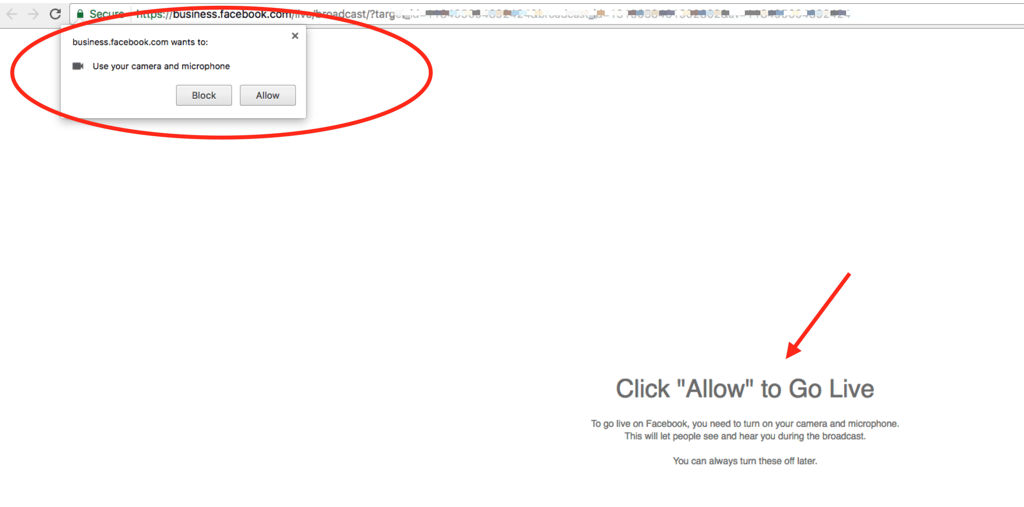
Step 3: Allow Facebook to Access Your Mic and Camera
Step 4: Preview Your Live Event
Don’t panic during this step. Your camera turned on, but you’re not live - yet.
Check your lighting, makeup, hair - ya know - all that important stuff. 😀
Once it all looks good, click the blue “Go Live” button in the bottom right hand corner.
It’s that easy!
Need More Answers? Here's the Top Facebook Live FAQ
Below are the top questions answered by Facebook. You can find all FAQ here.
As with any other post, you control who sees your Live videos. Choose your audience before you go Live by tapping the privacy setting and selecting the audience you want.
Can I practice by going Live without people seeing my video?
Yes. Just adjust your privacy settings to “Only Me” before you tap the “Go Live” button.
Yes. Immediately after you finish your Live video, you'll have the option to delete it from your Facebook timeline. You can also go back to your profile anytime to delete any of your older Live videos, just as you would delete any other post.
Can people comment on my Live video?
Yes. The audience you select for your privacy settings also determines who can comment on your Live video.
Can people leave a reaction on my Live video? Can I delete comments left during my Live video?
Yes. You can delete any comments left during and after your Live video.
Will people know my location when I go Live?
As with any other post, you control whether your location is shared when you go Live. If you have Location Services enabled, you can tag the location of your broadcast before you start broadcasting. If you don't want your location shared, do not add your location to your broadcast before you go Live.
The Live Map is a visual way to explore public live broadcasts that are currently happening around the world. Only public broadcasts that have a location tagged are eligible to show up on the Live Map.
You can go Live for up to four hours in a single session.
Final Thoughts
As you get started with live video, remember:
The most important aspect is the value you provide.
Solve a problem, share an example, offer a tutorial or walkthrough of your product.
And whatever you do - always have fun.
Your energy is felt through the screen. Make sure it’s a positive takeaway and not a negative for your audience.




ViewHide comments (11)